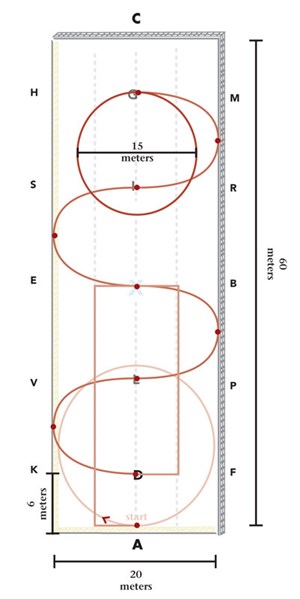
A jack-in-the-box is not only a children’s toy, but also a fun exercise inspired by all of the things we have covered this year in Dressage 101. Just like its literal counterpart, this exercise incorporates a box, lots of turning and a surprise at the end. Let us ride through the exercise to better understand the geometry:
Step One—A Box with a Crank: Recall how we rode our 20-meter circles and diamonds in the January and May issues, respectively. We are going to rotate that diamond to form a square and ride straight into it from our 20-meter circle. Here is how:
1. On the right rein, ride a 20-meter circle at A.
2. Make it a point to hit 4 meters past K on the track, 2 meters past L on centerline and 4 meters before F on the track, to form a correct 20-meter circle.
3. Immediately after your circle, make a 90-degree turn onto the quarterline so you are parallel to the long side of the arena.
4. Ride down the quarterline until you reach E.
5. At the point on the quarterline next to E, make a 90-degree turn and ride another straight line toward B.
6. At the quarterline before B, make another 90-degree turn right.
7. Ride down the quarterline until you are next to F.
8. Ride a 90-degree turn right toward K. Note that you do not want to continue all the way to the corner since you will not have enough space to turn without getting stuck against the end of the arena.
9. Finish your box at D.
Now that you have formed a 20-meter circle and a box, notice how the circle developed the bend in your horse while the box confirmed that you still had control of your straightening aids. Remember that it is common for your horse to drift out on the circle, so riding a box (or diamond) immediately after is a good way to check that he is between your aids.
Step Two—The Spring: Now that you have checked that your horse can bend and straighten, it is time to combine the two with the serpentine we reviewed in March. This time, however, we are going to challenge you with tighter turns to test your proficiency in riding smaller circles, as we reviewed in the July issue. This is also a great way to confirm that you are comfortable with the geometry of the arena since you will be riding across the invisible letters on the centerline. Here is how to ride 12-meter serpentines:
1. Once you have completed your box at D, ride a 12-meter half circle right to L.
2. Straighten for a moment over centerline to confirm that you are changing onto your next loop in balance.
3. Ride a 12-meter half circle to X on the left rein.
4. After straightening over X, ride a 12-meter half circle right to I.
5. Ride your fourth and final loop to G on the left rein.
Step Three—The Surprise: Once you have finished your four-loop serpentine at G, it is time to test your transitions with the big finish: a 15-meter canter circle at G. The exercise is new, but your repetition of transitions has prepared you for this moment. Here is how to ride the last part of the jack-in-the-box:
1. At G, as you turn out of the serpentine, pick up your left-lead canter as you begin your 15-meter circle.
2. Remember that your arena
is 20 meters wide, so you want to keep the circle 2½ meters in from the long sides of the arena. That is halfway between the tracks and the respective quarterlines.
3. Your circle should hit the centerline 3 meters past I.
4. Finish your circle by transitioning to trot at G.
Once you have finished your jack-in-the-box, you will notice how the exercise becomes progressively harder as you move from a 20-meter circle to a box to a tighter serpentine to a 15-meter canter circle off the rail—truly a game that can wind you up and finish with a bang! Consider it a litmus test that checks that your horse is listening to your turning, bending, upward and downward aids. It is also a great way to take your riding to the next level once you are warmed up and feel that the Introductory Level, Test C (June 2014) becomes too easy.
Hopefully, you will enjoy this exercise and it will inspire you to combine all that you have learned in new and challenging ways. Happy riding!