It is time to look at horse massage in a different way. Too many people think of this type of equine therapy as inaccessible?an expensive luxury that few can afford, often reserved for the international-level competitor. While many understand the benefits of horse massage work, not everyone can afford horse massage every day, week or even every month. I want to tell you what you can do to help your horse is already at the ends of your arms and in your grooming kit. The cost is the price of a hoofpick and curry comb. The time is as little as a few minutes a day. The benefits are potentially endless, including a healthier horse and improved work under saddle. Most importantly, you will connect with him on a level that is impossible any other way.
Before we begin, I want to be clear about our goals for this work. This article will teach you to feel how your horse reacts to pressure and stretching in a more in-depth way. I will give you the tools to assess what feels normal and what does not on a regular basis. What this article will not do is turn you into a do-it-yourself professional masseuse. I don’t expect you to identify each and every muscle by name by the end or professionally assess and treat all of your horse’s muscle problems.
Consider this an unmounted variation of what you are already striving for every time you ride: connecting completely with your horse. Imagine the harmony between a top horse and rider during their best rides. My goals are also to improve the horse’s performance, but the most enjoyable and rewarding moments are when I completely connect with him in the process. Another similarity between massage and riding is that you can use a professional massage therapist as you do your dressage trainer for the work we are discussing?at certain points, it might be helpful to work with him more frequently to get a better understanding. Other times, your therapist might come in to give a tune-up to your horse and give you a more in-depth look at how things are going or provide more profound physiological results. When you do have him out, don’t be afraid to discuss your horse’s status. Ask for personalized tips on how to work on your horse between sessions, related to what your horse is currently dealing with. In the end, all of the information you gain will only add to your toolbox and make you more aware of how you can help your horse.
Develop a Game Plan
The goal in all of this work is to explore your whole horse from head to tail. Take your time on this, and don’t be afraid to ask a massage therapist or vet if you have questions. From the first time you do this, you are learning more about your horse and also identifying possible red flags to keep an eye on. As you prepare to start your first massage on your horse, you will need these items:
1. Your hands! Make sure your
fingernails are clipped!
2. A hoofpick with a blunt handle that you will use in a specific exercise.
3. Any curry combs you might have in various sizes and shapes that will be used in various ways.
4. A printout of an outline of a horse from multiple angles and a highlighter pen. Many massage therapists use these during their sessions to mark/highlight when they hit a reactive point.
Here is how to use your tools: Put your horse in a location where you are most comfortable grooming him. You can try the crossties or, in my opinion, proceed more safely in his stall (where he’s probably most comfortable and calm). I almost never work on a horse outside his stall. But with regard to making this choice, and throughout these exercises, you must use your best judgement as a horseperson. Remember, all horses have the potential to bite or kick as a reaction to palpation, even your sweet, middle-aged gelding who has never done anything wrong. So be cautious and prepared.
Step 1: Familiarize yourself with your pressure techniques: Let’s begin work at your horse’s neck. This is a great place to first practice all your pressure techniques because it is not threatening and you are in a relatively safe place.
Start with pressure from the pads of your fingertips. Using the pads of your fingers, apply a superficial (light) pressure to your horse with a
supporting second hand over the first. Layering your hands allows them to share the workload and prevent stress on your fingers. Make sure that any time you use your fingers on your horse, your fingernails are not digging into him.
Using the notion that the horse’s muscle fibers generally are in the direction of the hair growing over them, apply your pressure in the direction of his neck hair with your finger-pad pressure.
As you start to work with your horse, notice how he responds to this superficial pressure. Try applying more pressure so you gradually build to a medium and then a deep pressure. It is important to interpret your horse’s reactions from your massage and this begins with knowing what to expect. When your massage feels good to your horse he will give you subtle signs. He might start to lean into your pressure and try to groom you. He might extend his muzzle out and start to groom the wall. You might notice his breathing getting softer, his heart rate slowing or a general feeling that your horse is more supple to your hand.
On the other hand, if your horse feels pain or soreness, the signs are usually more obvious. He might move away from you, start to get an uneasy look in his eyes or tense his body. In more extreme cases, he might try to bite, kick, rear, strike or buck. Additionally, his muscles might start to spasm.
As you notice him have any type of larger response to certain pressure, it is most important to know that just because a horse is reactive does not mean he is sore. For example, while he might react to being touched on his neck (or later, on the rest of his body) that does not mean he is in pain. Soreness is pain that the horse feels in a specific activity and it needs to be addressed. While a sore horse will be reactive, a reaction to touch doesn’t mean that point is sore. When you get a massage and a point hurts, that is reactive. If it doesn’t affect your everyday performance, then it is not sore. What you can do with this information is notice how your horse reacts on either side of his neck. Does he react much more when you apply superficial pressure on the upper part of his neck, or on the left versus the right? Take that information and don’t assume your horse is sore, but do note the difference. If you are concerned by the reaction, you can always call your vet to ask for a professional opinion. Regardless of what you feel, mark your printout with your highlighter to note reactivity.
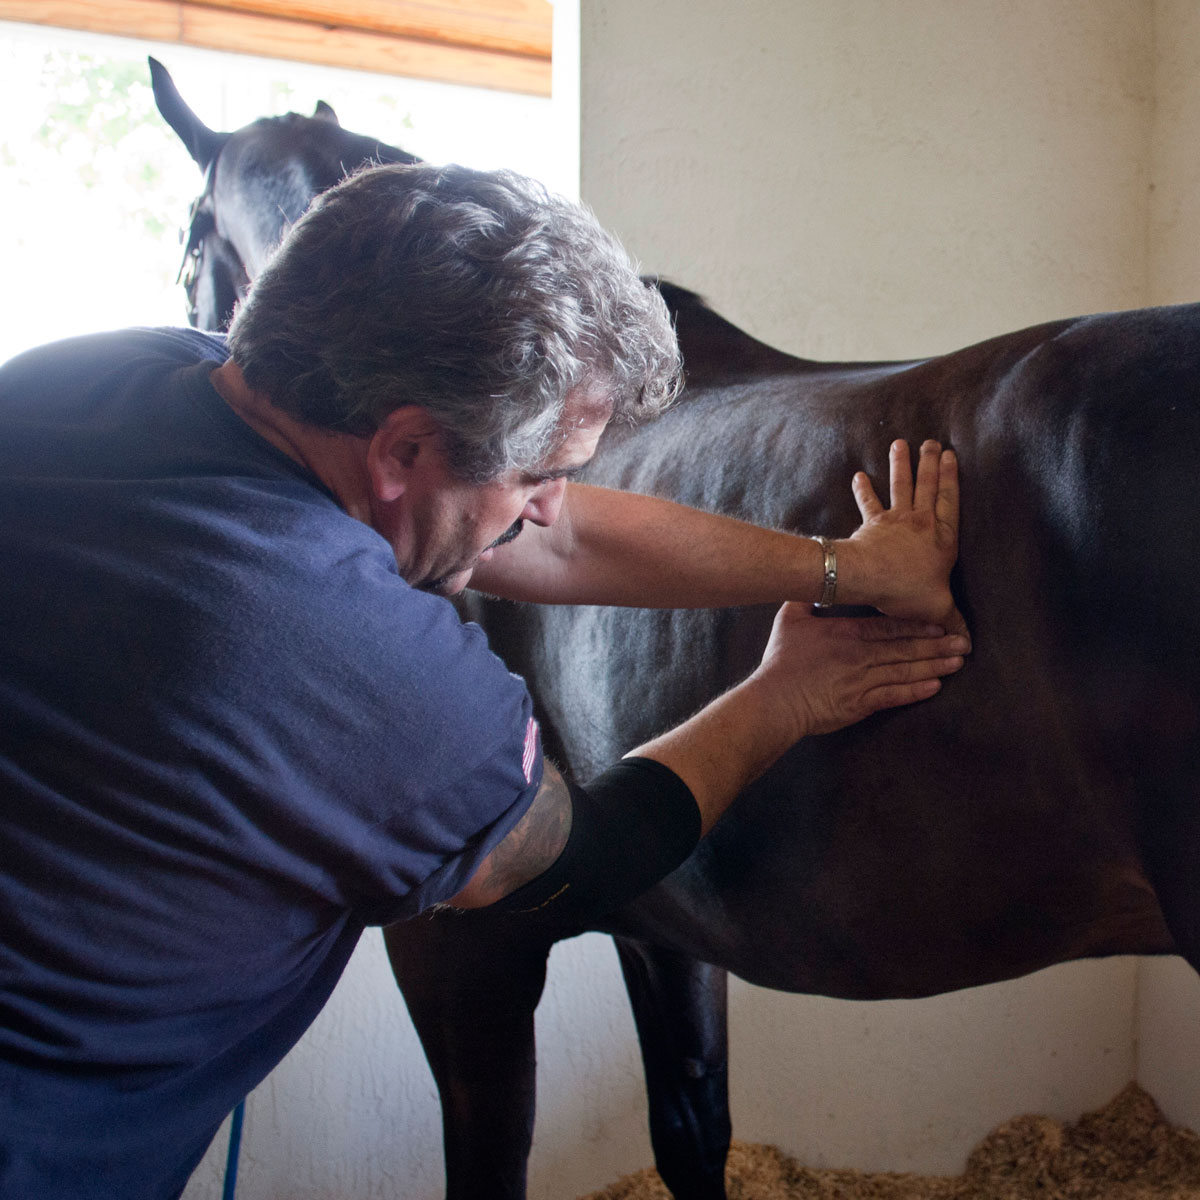
Now that you are more familiar with using the pads of your fingertips, it is time to try out the heel of your palm as well. In the same direction of the hair, place the palm of your hand against your horse’s neck. Use the side of your second hand (in the shape of a fist) on top of the first to apply a medium amount of pressure to direct the first hand. This reduces fatigue and stress on your hands to use both together. Does this different pressure get a different reaction from your horse? Do you get more reaction when you go across the hair? This is a good time to start to see what feels best on your hands because not all techniques are best for everyone (or their horses).
Now try another type of pressure that can be superficial and heavy: thumb pressure. Apply your thumb to your horse and hook your other hand around it in a supportive way. By sharing the pressure with both hands, you can support that one finger and dictate the amount of pressure more easily. Again, note any reactions from this type of pressure and what is most comfortable on your hands and your horse.
Step 2: Apply your pressure techniques to the rest of your horse: Working your way down to your horse’s shoulder, continue trying out the various techniques for applying pressure. Note how your horse reacts and write it down on your printout.
The introduction of deeper pressure in the shoulder area might be the first place you see some bigger reactions from a horse that is currently in work. Some people are quick to say that if you put deeper pressure in the left shoulder, and he steps away or starts to move his skin as if a fly is on it, then he is sore. Sometimes a horse’s skin will move if your pressure is too light (and tickling him) or too deep. Either way, it is irritating him. Just because the left shoulder is reactive does not always mean the horse is sore and needs medical attention. However, what it always means is information. Perhaps performance has not been affected yet. By massaging your horse frequently, you will learn to understand what reaction is typical in your horse and what is new and probably represents soreness.
Return to your superficial pressure techniques as you work your way to your horse’s torso and toward his tail. In the case of the rib area, the pressure technique you choose should be very superficial and refined in how much area you are covering. Thumb pressure is a great technique to achieve this.
Now work your way over his back and down to his hind end. As with grooming, don’t massage as hard in the less-meatier areas like the shoulder. Notice how your horse reacts to pressure with and across the hair (muscle fibers).
Step 3: Use your tools: Return again to your horse’s neck for safety’s sake and try your grooming tools. They can give you a new way to apply pressure and might feel easier, especially if you have hand or wrist problems.
The curry comb: There are two ways to use the curry comb:
1. Use the edge as an extension of your fingers to give you a deep pressure.
2. The curry used flat, as during grooming, can give a more shallow pressure. This is a good approach to create compression (straight, repetitive pressure without leaving the horse) and friction (pressure across the muscle fibers and hair). Try different curry combs because a plastic one with short teeth can give a very different feel from a rubber one with long teeth.
Now continue on to other parts of your horse’s body, excluding his legs. The rule of thumb is don’t use pressure where you wouldn’t curry your horse. Trust your gut and your years of experience around horses to know where you can apply various amounts of pressure and where it is safe to stand around your particular horse. Always err on the side of caution.
The hoofpick: Consider the blunt end of the hoof pick instead of your fingers only when asking for a low-back flexion (when you apply pressure in a line down your horse’s hamstring to ask for him to lift his back). Apply the pressure gradually and avoid abrupt pressure. If you are not familiar with asking for a low-back flexion, I highly recommend having a vet or massage therapist show you this exercise in person.
Once you have a general idea of how your horse reacts to various types of pressure, keep track of changes over the course of several days and weeks on additional copies of your printout. For example, when you apply flat curry pressure to your horse’s right shoulder on the third day, do you notice him react more sensitively than he did on the first day? Maybe your horse seemed reactive in his back when you applied palm pressure the first day, but now he is not. The most important thing is you are taking note of his typical reaction and how it changes. From that point, you can use that information to see how that translates to his being sore. Maybe he is reactive (steps away, tries to bite or kick out, flinches, etc.) because you are pressing too hard. Perhaps he was just at a long show or demanding clinic weekend. Does the reactivity continue the next day? Don’t be afraid to call your vet and talk about what you are feeling. Communicate with your massage therapist, trainer, barn manager and farrier, etc. as you start to identify information they can help you with. The key is to know your horse better than you did before and connect with him in an even deeper way.
This article was originally printed in the December 2011 issue of Dressage Today. To gain up-to-the-minute access to all Dressage Today has to offer, consider subscribing!