The canter lengthening, a First Level movement, is your means for toning your horse’s topline and belly muscles, both critical to successful upper-level work. The canter lengthening is like the stepchild in fairy tales—it’s often overlooked. With the myriad of other details to concentrate on, the canter lengthening never seems very compelling until a moment of truth, like being in a show when your reader calls, “F to M, lengthen the stride in canter.”
Since cantering tends to excite the flight instinct in horses, there is an increased likelihood for them to come off the aids when you ask for a lengthening, which is why this requirement is treated seriously by judges.
When your horse remains attentive and executes clear transitions in a lengthening, you, as well as the judge, can be assured that your half halts are working, you have a clear back-to-front connection and your horse is truly supple and elastic. In other words, transitions within the canter are a good way of knowing whether your horse is through. Giving the canter as much concentration and effort as you do the trot not only helps to solidify the basics, but is essential in preparing the horse for upper-level work.
The canter is a natural conditioner of a horse’s back, causing it to stretch as he brings his hind legs under to thrust himself into the suspend phase of the stride. This puts him momentarily in the posture of collection. By carefully balancing your horse so that the haunches don’t overpower the forehand during the canter, you are strengthening the loin and belly muscles needed for sustained collection.
The inherent nature of the working canter can be of great assistance in getting your horse to respond to a light leg. Once you instill such sensitivity in him, you will be able to collect him without losing impulsion and engagement. This will keep him supple and forward as you begin to teach him to wait—to come up to you—before negotiating the smaller turns and the smaller circles that eventually become the canter pirouette.
The elasticity required for transitions within the canter is essential for training flying changes. Changes are largely a matter of coming back—responding to the half halt—and immediately going forward with enough jump to be able to change leads.
All things considered, then, riding transitions within the canter helps to strengthen and develop your horse, gives you clear feedback on your horse’s thoroughness and improves his sensitivity to the aids. Before beginning to work on the canter lengthenings, however, you need to have the following qualities ingrained in your horse:
· He moves forward easily from a light leg. This enables you to bring his hindquarters under in both the downward and upward transitions so that your horse remains round.
· He can sustain impulsion without your needing to pump with your seat and back.
· He yields to both the right and left rein and can be even on both.
· He is straight in the canter as well as during transitions into and out of the canter.
· He is active and relaxed in both leg yielding and shoulder-fore.
· He is consistently in self-carriage.
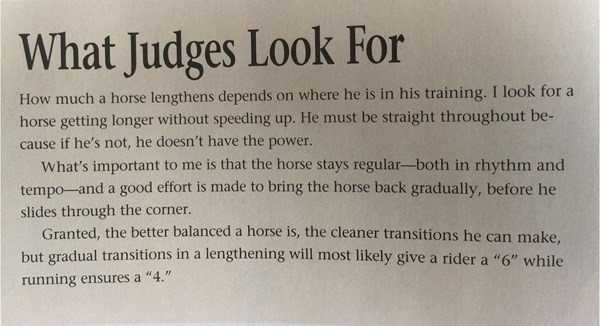
Once you are assured of your horse’s readiness, begin your schooling on a 20-meter circle, asking your horse to lengthen just a few strides. Then, “collect” him softly. Tight your legs and use your seat to coil him up—collect him—and soften your back to lengthen. Avoid the temptation to pull the reins for the downward transition. This only invites your horse to set himself against you. If you are accurate in your 20-meter circles, you will quite naturally have your horse engaging his hind end. Gradually increase the number of strides until your horse is able to lengthen for half the circle, then “go large.”
Now, using the entire ring, try to lengthen six strides and shorten for six. Whenever your horse starts to lean in the downward transition, very carefully, very gently, ask him to go forward again—just a bit, not a lot—so that he just starts thinking about accelerating, and then ask him back again. Give your aids at that point in the stride when you feel your horse’s hindquarters raise.
This exercise keeps your horse ready for both transitions—there are no surprises—and he stays off his forehand. Very quickly, he will be thinking “forward” and bringing the haunches more under for all transitions. This improves your horse’s elasticity as well as your connection.
The final preparation before actually asking your horse to lengthen the entire long side of the arena is to practice the beginning and ending of the movement. This will help instill in your own body the best way to prepare your horse for both transitions. Of course, you do this at canter.
· Get into the habit of going deeply into your corners to give yourself time to set your horse up. He must learn to wait and not fall around the corner on his inside shoulder.
· Ride a shoulder-fore a few strides after you have rounded the corner. Be sure you have weighted—without leaning or collapsing— the inside seat bone for both the corners and shoulder-fore. If you find your horse resisting, you likely have slipped to the outside seatbone and are attempting to use your inside rein to counteract the effect. Correct your position to avoid resistance and to keep him straight.
· Go rhythmically from the shoulder-fore to straight ahead. Sit evenly on both seatbones. Keep the small of your back soft so that you follow the canter with your seat while keeping your shoulders still.
· Finally, ride a shoulder-fore from the second-to-the-last letter to the last letter on the long side, and then ride straight into your corner.
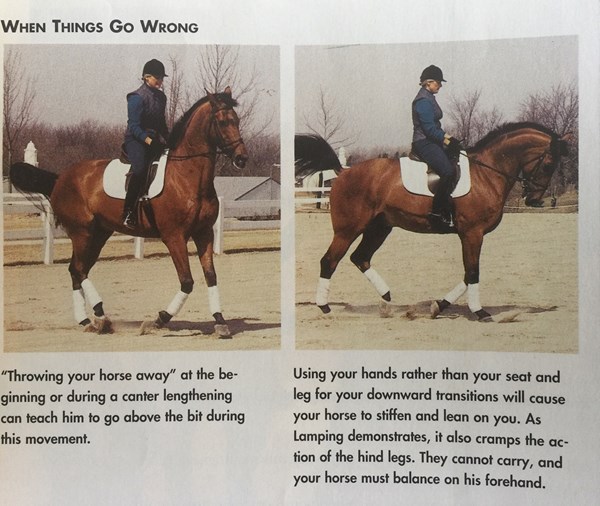
The use of your corners, combined with a few strides of shoulder-fore, will help ensure that your horse is engaged and straight in the transitions and throughout the canter. It will also help you avoid the trap of throwing your horse away for the lengthening, hoping the corner will bring him back.
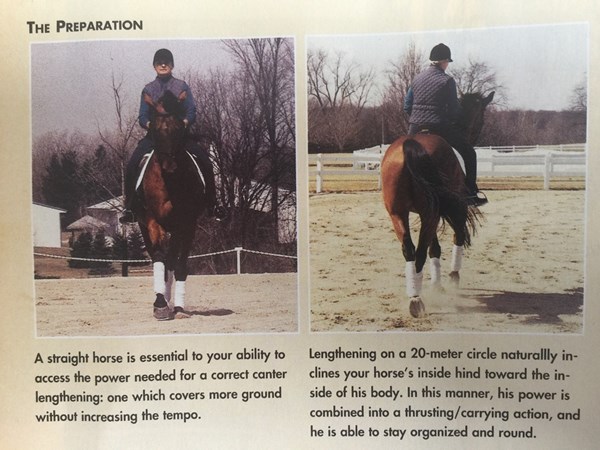
Now that you’re fully prepared, it’s time to lengthen down the long side. Go through the same procedure of getting into the shoulder-fore from the corner. Sitting equally on both seat bones, close your legs to ask for a bigger push from the hind legs. Your horse should respond simultaneously to your asking, and you should feel him come up in the shoulders. As this happens—not before—soften your hands, allowing him to stretch his topline. Under no circumstances should he have any tendency to look to the outside or be positioned to the inside. If you have difficulty keeping him straight, focus on keeping the shoulders directly in front of the haunches with your outside rein before asking for any more lengthenings.
For your downward transition, weight your inside seat bone at the second-to-the-last letter to bring your horse’s shoulders toward the inside track in a shoulder-fore position. No leaning or collapsing. Close your legs to continue bringing the haunches under as you sit more deeply to restrict the forward, ground-covering movement. Be ready to nudge your horse with your seat if you feel him start to break. This is exactly what you did in your short intervals of lengthening earlier. If your horse goes “deaf,” immediately out him on a 15-or10-meter circle to cause him to engage his inside hind.
Throughout this whole process, be careful not to ask more than your horse can handle. A few good steps will lead to more good steps; a slightly longer stride will lead to a much longer stride, and one where your horse is in balance.
When you begin the training, don’t expect the same degree of performance that would from the “educated” horse. At the same time, you must be willing to “let go” so that he is able to use his back. It isn’t beneficial at all to get your horse stuck or afraid of trying.
When you get it right, your horse’s back will be very soft and loose. You will have the feeling that you are covering more ground without going faster—like being slower in front but more forward behind. If you have had any experience in jumping, you can think of the lengthening like riding a spread of bounces down the long side.
A USDF bronze, silver and gold medalist, Natalie Lamping is a well-known Grand Prix competitor, trainer and coach. She has ridden several horses to AHSA national championships and was on the USET long-list in 1977. In 1985, she won the gold medal at the Olympic Festival. In 1986, she was short-listed for the World Championships. Lamping is an AHSA “S,” a CEF “S” and an FEI “I” judge, who has conducted the national and international AHSA Judges’ Forum.