)
When we moved our horses to Florida two winters ago, one of my favorite students wanted to stay north, so she moved to a gorgeous facility with a very large dressage arena. It was about 80-feet wide and the standard 198-feet long. When I went to teach her that following spring, she was wandering around like the lost tribes of Egypt. By now, she has figured out how to ride in that arena, but at the time, her horse was strung out and falling left and right with his shoulders and hips misaligned more often than not. The horse was very unbalanced. It is, of course, very possible to ride well in a large dressage arena, but it’s hard. Not only do you need to understand the geometry of a standard arena, you also have to understand the geometry of an extra-large arena, too. You must know, for example, precisely where the 10-meter line is because it won’t be on the centerline if your arena is extra-wide.
As an Amazon Associate, Dressage Today may earn an affiliate commission when you buy through links on our site. Products links are selected by Dressage Today editors.
If you’re a rider who is bemoaning your lack of riding space, take heart from knowing that some of the best dressage trainers in the world intentionally built small arenas. Klaus Balkenhol is one of them. The Balkenhol indoor arena in Rosendahl, Germany, is très élégant—or, I should say, sehr elegant—but it’s not large. It’s standard width but shorter than standard length. That’s the case with my arena and many others that help build strong dressage horses.
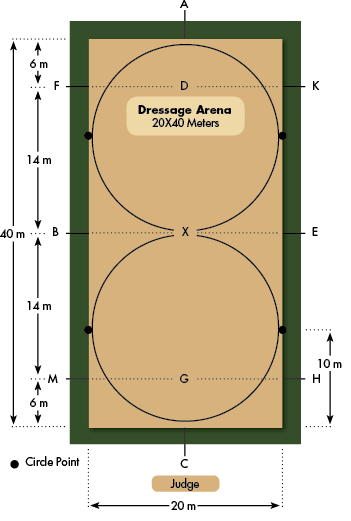
The width of a standard arena, 20 meters (about 66 feet) makes precise 20- and 10-meter circles easy to figure. I didn’t say they were easy to ride, but they’re at least easy to figure: The 10-meter circle goes from a specific point on the track to the centerline and back to that same specific point on the track. The accuracy of those 10-meter circles is one of the secrets to putting your horse on the aids. The 20-meter circle has exact circle points on the long sides of the arena and on the centerline.
The length of a standard arena, 60 meters (about 198 feet) allows for exactly three precise 20-meter circles, and the accuracy of those figures is, again, one of the secrets to putting your horse on the aids. But you can skimp on the length of your arena without detriment to your riding technique. You can always do two 20-meter circles in a figure eight instead of three in a serpentine. You can’t skimp as well with the width—the most difficult arena to ride in is one that’s too wide.
The precision of figures is a hallmark of dressage, not just because dressage riders are a neurotic crowd, but because accuracy helps your horse build muscles symmetrically and helps him move fluidly. Accuracy helps him stay straight so all his energy goes in the same direction—toward the bit.
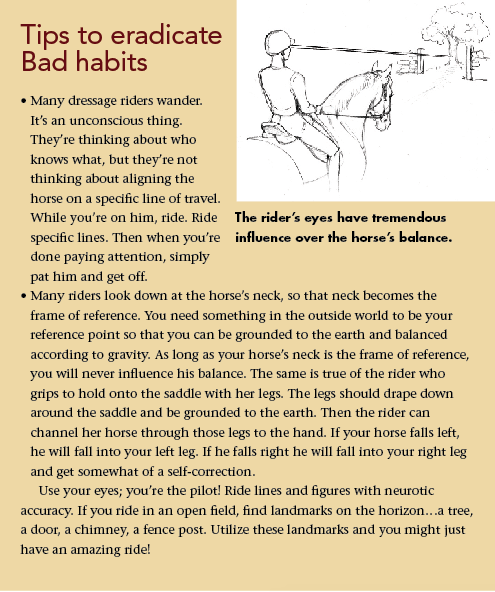
Check out the diagram of the standard arena to the right. It’s the rider’s job to keep her horse on one of those lines. If you’re not on one of those lines, ride another one that is clear, defined and determined by you. If you aren’t determining the line of travel, your horse is. And if he’s determining the line of travel, he won’t be doing it in a gymnastic way. It’s your horse’s natural inclination to move in a way that is as easy as possible—which isn’t the way of the ballerina or the gymnast. If he’s determining the line of travel, he will lose his straightness and his balance.
Here are some tips to help you ride accurate figures:
Tip 1: If you have a sand arena, ride in it immediately after it’s been dragged. Be very accurate and when you ride a diagonal for the second time, look at the footprints of your first diagonal. Was your line straight or did your horse try to bulge off your line toward the long side? Make it a game and work on it.
Tip 2: Learn to pace off standard distances and use cones to make it easy to ride a correct figure. If your arena is short, pace off where the 20-meter point is on the centerline and long sides and put a pair of cones in those spots to ride through. Cones are one of your best friends and can improve your riding by helping you be true to your line. If you’re riding a 10-meter circle, frame your destination point on the centerline with a pair of cones.
Tip 3: If your arena is too wide, try using rails to set up a smaller arena within your space. It’s fun to ride in an arena like that because you can spontaneously go outside the standard arena at times to refresh your horse a bit. Horses love that.
Tip 4: Choose two points. There is only one straight line between those points. Whatever you’re doing (leg yield, half pass, shoulder-fore), stay on the line. Then every step will be the same, helping your horse’s balance. When you leg yield or half pass from G to V, keep the shoulders on that one-and-only line and every step should be the same.
Exercises for the Small Arena
Although some horses are more naturally balanced than others, none of them balance on their own. Riding accurate lines and turns improves your horse’s balance. Know the anatomy of your arena. Know the precise circle points of 20-, 15-, 10- and 8-meter circles and ride your lines and figures accurately. Here are four exercises you can use to help balance your horse no matter the size of your arena.
Exercise 1: Ride Accurate Circles
Riding an accurate circle is actually very difficult. Find someone who is experienced at longeing. The person should know how to handle the line and know what to do if the horse becomes upset, but the actual job of this person is very simple. She stands like a post with a precise length of line in her hand. If you have a Training Level horse, the longe line might be about 8 meters long, giving you the opportunity to make a perfect 16-meter circle. Start at walk. It’s the job of the rider to be sure there is no slack in the line and the horse isn’t going outside the line. The precise 8-meter line simply allows horse and rider to figure it out. The person in the center should not move. The line can be supple, but it shouldn’t change in length. When it’s mastered at walk (which might take quite a few tries), go to trot. The rules are the same in trot.
The First Level horse can do a 10-meter circle, so the line should be 5 meters long, allowing the horse to go from a specific point on the long side to the centerline or the 10-meter mark and back to the same point on the long side. This isn’t easy, but when you can do it, it opens many doors. When you have control over a 10-meter bend you can easily retain the bend in, for example, shoulder-in. If you can’t do a 10-meter circle, your shoulder-in might look OK, but it isn’t right.
Caution: Don’t do too many circles in a row. Do two or three and then go straight down the long side and repeat at another point. Then go straight again. Change directions, too, and don’t try to master this in one day. There’s always tomorrow.
Exercise 2: Shoulder-fore
Other than accurate lines, the shoulder-fore is the best way to keep your horse straight and balanced. Try it first in walk, then in trot and canter. Here’s how you do it:
Step 1. With your inside leg and your inside fingers, ask for a tiny bit of flexion (not neck bend) to the inside. You should be able to see your horse’s inside eye.
Step 2. With your inside leg, try to align your horse’s feet so his inside hind steps between the two front feet and the energy goes to the outside rein.
Step 3. With your outside leg, prevent your horse’s outside hind from stepping out. You want it to step in the same line as the outside fore. You might need a mirror or a video or a friend who can give you feedback.
Step 4. Be sure to retain the rhythm of your horse’s gait.
Shoulder-fore isn’t exactly an exercise, because you should ride in shoulder-fore all the time. It is simply riding in lateral balance with your horse on the outside rein from your inside leg.
)
Exercise 3: Shifting Shoulder-fore
Once you’re fairly comfortable with shoulder-fore, try this exercise on the long side. Staying in shoulder-fore, simply bring your horse a half meter or less to the inside. Take him 12- to 18-inches off the track and then put him back on the track, all the time staying in shoulder-fore. Repeat this several times on the long side. This helps your horse listen to both the seat and legs and not get stuck on the rail. Do this in both directions.
Exercise 4: Spiraling Circle
This exercise is the same as Exercise 2, except it’s done on a circle.
Step 1. Begin in a marching walk on a 20-meter circle in either direction. Pay special attention to the alignment of your body and eyes with your horse’s body. Your horse’s ears should always be on the line of travel. Keep your body and eyes aligned with them.
Step 2. Let your bending aids shift your horse onto an 18-meter circle. Make the circle line precise. You’ll be one meter inside the track of your 20-meter circle. Stabilize your horse on this circle.
Step 3. Let your bending aids shift your horse onto a 16-meter circle, 2 meters inside the 20-meter circle.
Step 4. Shift your horse onto a 14-, 12- and 10-meter circle. Do this gradually so you make your horse stable in each bend and balance.
Step 5. Gradually move back to a 12-, 14- and 16-meter circle. Then, finally move onto a consistent 18-meter and 20-meter circle.
Step 6. Do the same exercise in the other direction and then do it in trot and canter.
Notice that all these exercises and tips can be executed in a small space. Can they be executed in a large space? Yes, but it’s more difficult. You just need to know where you are. Orientation to the outside world is how horses balance!
Beth Baumert operates Cloverlea Dressage, LLC, where she trains horses and riders from Training Level through Grand Prix in Columbia, Connecticut, and Wellington, Florida. She is a USDF Certified Instructor and an “L” Program Graduate with distinction of the USDF judging program. Baumert is the author of When Two Spines Align: Dressage Dynamics. She is the technical editor for Dressage Today and president/CEO of The Dressage Foundation.
This article first appeared in the January 2018 issue of Dressage Today.