

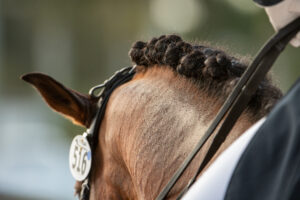
For breathtaking beauty in the competition ring, a well-appointed dressage horse knows no equal. Adding to the allure are the exquisite “button” braids that are traditional in this discipline. Larger than hunter braids, they form little rosette-like decorations along the crest. This style helps highlight the muscles across the horse’s topline as he executes one precision movement after another.
Why not add dressage braids to your skill set? In this video series, Jennifer Callahan, training barn manager of Hilltop Farm Inc. in Colora, Maryland, shows us how on the Holsteiner stallion GK Calucci (“Lucas”). (For more information about both Lucas and Hilltop Farm, see the editor’s note after this article.)
Braiding Tools

Before you begin, assemble the following items. Jennifer keeps her braiding tools handy in a pocketed belt tied around her waist.
- Metal pulling comb
- Small rubber “braidette” bands in a color that closely matches your horse’s mane color. Although you can sew dressage braids in using a needle and waxed thread, Jennifer prefers rubber bands for braiding competition-bound horses and “wiggly” young horses alike. “Done well, they will look equally as good as sewn-in braids,” she says.
- A grooming spray designed to help control flyaways (Jennifer uses Exhibitor’s Quic Braid)
- Several hair clips or clothes pins to keep extra mane out of the way
- A pull-through braiding tool and mane-colored yarn for the forelock
The Steps
Step 1: Mane Prep
Start with a clean mane pulled or trimmed to about 6 inches. “If the mane is thinner, you could go a little shorter,” Jennifer advises, adding, “For really thick manes or horses with thick crests (stallions), longer is better.”
Step 2: Measure The Width Of Your Braids
On the pulling comb, mark the width of mane that you want to section off for each braid. This helps to ensure consistent size all down the neck. (Jennifer marks her comb at ¾ of its width for a “medium” size plait that is easier to keep snug and that flatters all size necks. “We braid foals through performance horses at Hilltop, and medium looks good on all of them,” she notes.)
Step 3: Clip Excess Hair Off
Starting at the poll, section the hair for your first braid at your preferred width. Use a clothes pin or hair clip to keep the unbraided hair out of the way.
Step 4: Wet The Hair
Before braiding, spray the section of hair from roots to ends with your grooming spray. If your horse’s mane is particularly unruly, spray the whole mane lightly before starting, doing the same with each individual section as you braid it. This makes the hair a little easier to tackle.
Step 5: Start From The Poll Down
Begin braiding, making sure you do so tightly. Think about pulling each section across instead of down, and braid as far down the section of hair as you can before using a rubber band to tie the end off. “I like to loop the extra hair I can’t get braided into the rubber band, just to keep the ends clean,” Jennifer says. “Do this all the way down the neck, keeping the braids the same width down the neck.”
Step 6: Create The “Button” Look
Once you’ve gone all the way down the neck, you’re finally ready to put those lovely braids up. There are two methods that Jennifer likes for “button” braids:
a. Folding method
Fold the braid in half, pushing the end up under the base of the braid. Then fold it in half again. “Make sure you’re pushing the braid firmly onto the crest of the neck; we don’t like floppy braids!” Jennifer says. Once you’ve folded it in half twice, take another rubber band and tie your braid into place. You want the rubber band to be as close to the base as possible to make it sit nicely on the crest. Be sure to put the rubber band on tightly, winding it around as many times as you can.
b. Rolling method
If your horse’s mane is an odd length or thickness and folding just isn’t working, try rolling your braids instead. Starting at the end, tightly roll the braid up under itself all the way to the crest/base, in the same direction as you loop a hunter braid. This time you’re just rolling the braid tightly to create the little “button” along the crest. Then secure it with a rubber band as outlined in the previous method.
When you’re practicing dressage braids, Jennifer suggests you try both methods; the end result should look the same. (In the video, Lucas’ mane was braided using the folding method.)
One of Jennifer Callahan’s braiding secrets might have you nodding in agreement. “I don’t know if this is a fun fact or an ‘I can’t believe I’m admitting this,’ but as I’m braiding, I keep the rubber bands in my mouth,” she admits. “They taste terrible, but it works for me! The bands don’t seem to break as easily when wet, and when you braid young horses, you’re sometimes braiding a moving target! This is faster for me but might not work for everyone.”
Step 7: Forelock
Finally, braid the forelock in the same manner as for hunter braids, using mane-colored yarn instead of a rubber band for a “clean and classic” look:
a. French-braid the forelock using strands of mane from each side and the middle. Weave the yarn in halfway through, like you did with the mane. Unlike the mane, however, it’s important to avoid braiding the forelock too tightly. You need to leave enough room to pull the tail of the braid up into the French-braided portion.
b. Using a pull-through tool, pull the yarn and tail of the braid up into the French-braided portion. Again using the tool, pull each strand of yarn horizontally through the sides of the French braid at the poll—one to the left, one to the right. Then tie the strings together on top and knot them. Trim off the extra yarn.
The Results
Step 8: Admire Your Work

Once the braids are all done up, step back and look at them from different angles. They should all sit nicely along the neck. If there is one braid that sits a little higher or lower, now’s the time to redo it! After you’ve finished, pat yourself on the back and be sure to take plenty of photos.
We’ve said it before, and we’ll say it again: Every horse’s mane is unique, but the more you practice, the easier and faster braiding will become.
Editor’s Note
GK Calucci (2001 Holsteiner stallion, 16.3h, by Calido I) is approved for breeding with sBs, Westfalen, ISR/Oldenburg, & Rhineland registries. Offspring are also eligible for KWPN registration. “Lucas” has a long show record from both Germany and the U.S., competing up to the Grand Prix level with both a professional and an amateur rider. After he retired from competition, he moved to Hilltop Farm to begin his breeding career. The oldest crop of Calucci offspring turn 4 this year, and Hilltop Farm employees say they “definitely see his strong stamp come through in his offspring.” For more information, see http://www.hilltopfarminc.com/stallion/gk-calucci/.
Hilltop Farm Inc.(www.hilltopfarminc.com) is a world-recognized training and breeding facility in Colora, Maryland that typically offers breedings from more than 25 warmblood stallions each year via both cooled and frozen semen. Also offered are extensive mare management and young horse raising programs. The training department focuses on the development of dressage horses up to the Grand Prix level.
For more grooming advice from top dressage grooms, click here.