

Of the many ways to work your horse in-hand, all of them have the goal of exercising your horse without weight in the saddle. While many people are familiar with this type of work for teaching piaffe, it can be used from the beginning of a horse’s training and is a great way to warm up for your ride. When I was working at the Spanish Riding School, we did not have mounted warm-up space to use ahead of presentations so we used in-hand exercises. In this article, I will explain how to use proper equipment and training approaches that are level-appropriate for your horse. As a result, you will be able to properly develop collection and an uphill balance in your horse.
Introducing In-Hand Equipment
No matter how advanced your horse is, the following steps will walk you through correct in-hand work. Begin by wrapping your horse’s tail so you will be able to touch his whole hindquarters with the whip during work. Put the saddle or bridle on in the same order you tack up for mounted work.
If you are beginning with the saddle, place a well-fitting surcingle around it after you have placed the pad and saddle on your horse’s back and attached the girth. You will know the surcingle is a good fit when you are able to tighten it enough that it does not slip during work. If you only use a saddle, the side reins you will be using might move during work or be incorrectly placed on the girth. The key to an appropriate surcingle is that there are enough rings for attaching side reins at varying and appropriate heights. The side reins can attach to the bit or the cavesson, depending on your preference and your horse’s reaction to the varying contact.
Use your horse’s snaffle bridle so you have use of the bit. Over that, put on a well-fitting longeing cavesson. Make sure to remove the noseband of the bridle so that it does not get in the way or pinch the horse on the chance that it comes into contact with the cavesson during work.
When I work in-hand, I carry two whips that are an appropriate length for this type of training—one is stiffer and the other is softer. Before you know which in-hand whip you will need, you have to test to see which the horse prefers.
As you progress in your in-hand work, if your horse has an overreaction and seems unsure about coming under with his hind, consider your whip aid. Some horses react better when you touch them with the whip over the croup or on the hock, but you have to figure out where they prefer to be touched. Always look for the point on your horse to touch that makes him think, forward and come under.
Introducing In-Hand Work
With a pocket of sugar, a pair of riding gloves and a longe line, you are ready to work in the arena.
Begin by attaching the side reins from the surcingle to the bit rings. Make sure that their placement is parallel to the ground so they do not pull down on your horse. Instead, their height and length should encourage him to be on the bit. Remember that the goal is to build correct neck muscle, and we cannot do this without correct side-rein placement. Make sure the side reins are an even height and length on both sides before beginning so that when you hold your horse’s head with his poll at the highest point and his face on the vertical, your side reins offer a steady, unrestricting connection.
It is also worth pointing out that a more advanced horse will carry more weight behind, which will make him go up in the wither. We want to account for that by choosing a slightly higher surcingle ring to attach the side reins to.
The horse should not get excited when he is doing in-hand work. Our primary goal is that he is relaxed in his work. It is also our job to remember that we get to choose our horse. He does not get to choose his owner/trainer/discipline. As a result, we have the responsibility of checking in and confirming that we are making fair requests of our horses when pushing them to do something new. If, at any point, they get excited, reassure them with a pat or sugar.
Exercise One—Forward and Backward: The first thing I do when introducing in-hand work is to invite the horse to pick his legs up and achieve a square halt and rein-back correctly. As you are doing this exercise, make sure to watch your whole horse. If you stand too close, you are at risk of getting in his line of travel and you can’t see what he is doing with his body language. If you are too far away, you cannot use your aids effectively. Have the horse between your left hand and right whip on the left rein.
1. Touch your horse’s inside hind leg, just above the hock with your in-hand whip to ask that leg to come under. Cluck to reinforce the aid.
2. When he steps under with that leg, stop your whip aid and reward him.
3. Ask your horse to step forward and under with his legs until you have achieved a square halt.
4. With a soft half halt on the longe line, ask your horse to rein-back. Make sure he steps back in diagonal pairs. If your horse does not step back with
diagonal pairs, repeat the rein-back until it is correct.
5. If he needs a stronger aid for the rein-back, touch his shoulder with the whip to show him you want him to step away from the aid (as he did in steps one and two).
6. Touch his inside hind leg with the whip, asking him to step under again.
7. Touch his outside hind leg above the hock to ask that leg to step under.
8. Repeat the square halt and rein-back again.
This rein-back exercise is helpful in teaching your horse to move from his hindquarters, through his body and onto the bit.
Exercise Two—Turn On the Forehand: Now you can practice something a bit more advanced. The turn on the forehand is a great next step because it teaches your horse to stretch by asking him to step his hind legs in a semi-circle around his stationary inside fore while the outside fore moves forward only slightly. It encourages your horse to bend opposite his direction of movement.
1. Off the rail, stand to the side of your horse near his head.
2. With your whip, touch your horse on his haunches to ask him to move away from the aid.
With this movement, you should achieve an easy turn on the forehand. This type of lateral stretching is helpful for warming up your horse as well as relaxing him and building his muscles. Remember that dressage exercises the whole body, so make sure to do the turn on the forehand on the other rein. Everything has to be done as if you are playing, and you must always check that your horse is relaxed and happy in his work, not nervously moving away from your every move.
Advancing the Work

As your horse develops in his training, you are ready to start half-steps.
Exercise Three—Half-Steps: Using the same equipment as you did in the previous exercises, follow these steps to introduce half-steps to your horse:
1. Confirm that you can move him forward with a cluck and whip tap.
2. Ask your horse to move straight and forward with diagonal pairs (the two-beat trot rhythm) as you continue next to him.
3. With your whip, ask your horse to step under with his inside hind as you asked before with a touch on the hind. When you have achieved a few half-steps, stop your whip cue.
Pay attention that he is trying to carry extra weight on his hindquarters.
Once you have developed half-steps, you are ready to start thinking about piaffe with your horse. It is the most collected exercise in dressage, so sometimes introducing the work from the ground is easier than under saddle. This is an exciting time in your horse’s training, as he will completely change in balance and strength from this collection—from his withers to his hips to his hind legs.
Exercise Four—Piaffe: To prepare for piaffe, ask your horse to walk into a square halt, with his nose in front of the vertical. Remember that the side reins should not be pulling your horse down. When you first start this exercise, it is important to allow him to move forward when he is learning piaffe.
To begin, start from the halt and follow these steps:
1. Ask for walk on a straight line.
2. Shorten his steps by softly touching his croup with the whip (to cue his whole hindquarters) and adding a cluck.
3. Piaffe starts in diagonal steps and the hind should come up only one hoof in height. He should stay uphill.
4. If he is lazy, ask for more forward.
5. If he does not take weight back, insert your rein-back exercise and then move forward to piaffe again.
6. When he responds correctly, praise your horse for a job well done.
Just play when you are doing these exercises and don’t be afraid to combine your rein-back exercise with your forward and back exercise to take a break from the more collected work. What is important is that you remember to take a break, because a horse cannot concentrate for too long. This variety will keep him motivated in his work. As he develops skill and collection, only then can you work the piaffe without moving forward, so he performs the movement in place.
In-hand work builds the muscles because it is like bodybuilding, so repeat the exercises on the other rein.
The Double Longe
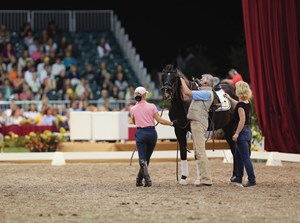
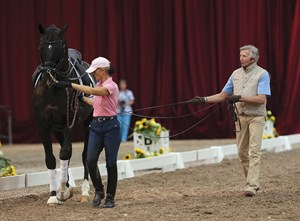
When you and your horse are comfortable with in-hand work, you can have two people work together with the double longe. The first person’s entire job is to watch and control the amount of forward movement with a lead line attached to the cavesson. She stays at the horse’s head during in-hand work.
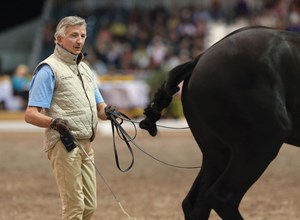
The second person’s job is to continue with the other elements described in this article’s in-hand exercises, but with two lines connected to the cavesson and running through the surcingle instead of the single line connected only to the horse’s head. This second person is the one who can tap with the whip and cluck to ask for collection while holding the double-longe lines. Again, this second person’s whip and voice aids ask the horse to collect or “come from behind.” The person does this by standing a safe distance from the horse, near his hind, to tap with the long whip on the hindquarters.
When you have the double lines, the surcingle should have rings toward the top so that when he is ready and more uphill, your horse can have a higher topline. You know he is ready (in this stage of bodybuilding) when you can ask for piaffe and the degree of collection needed for Prix St. Georges.
When you are comfortable with the double longe, you can ask your horse to perform all of the exercises you did on the single line: ask for straight, forward, back and collected. Don’t forget to reward your horse with a piece of sugar—it is always important to keep him as your friend.
When you are ready to develop your horse’s piaffe in the double longe, the first person asks for the forward movement. The second person, holding the two reins and the whip, asks for walk and then collects the horse into piaffe. As you develop this, you can continue asking your horse to move closer to piaffe in place.
During the piaffe exercise, the first person must remember to watch that the topline stays correct while this is happening. The key is for the handlers to communicate to each other. Correct the topline by making sure the horse does not hang on the side reins. Gently bring the horse up with an upward aid of the lead line.
Once a horse is comfortable with the double longe, the first person can remove the lead line and step away. At that point, the second person can connect the lines to the snaffle bit to facilitate increased communication. He can then stand as the second person and ask for the same collection and piaffe with his whip and voice aids. Always praise a horse when it is a job well done. Remember to stay quiet, so there is respect but not fear.
The Mounted Translation
Once your horse is under saddle, you can ride shorten and lengthen the walk steps, making sure that the highest point of the poll is right behind your horse’s ears. Play around by riding forward and back. We have to see that our horse learns to carry the weight.
Exercise Five—Collect Under
Saddle: Thanks to the in-hand work you have done, you can have a groundperson help you collect under saddle using the whip and voice aids.
1. The groundperson asks for piaffe forward, while the rider sits quietly.
2. The rider has a light rein contact.
3. Walk out of the piaffe.
Always avoid fear in your horse. The work in-hand will allow him to sit behind and go up in front, helping the shoulder to improve.
Now you are dancing!
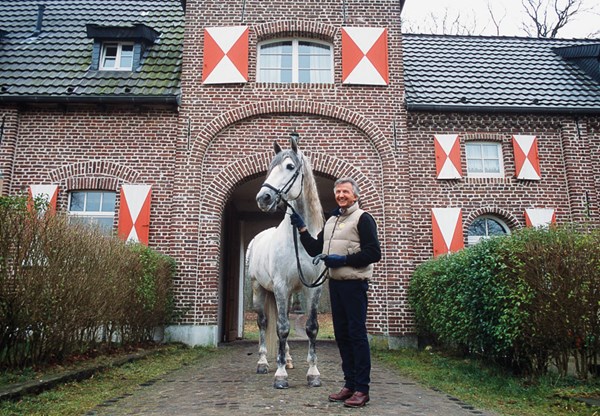
Arthur Kottas-heldenberg was the first chief rider at the Spanish Riding School (SRS) in Vienna, Austria, from 1995 to 2003. He joined SRS as a 15-year-old eleve. He was their the youngest bereiter (1981 to 1995) and chief rider in history. He kept that position from. Now retired from SRS and still based in Austria, he continues to be a sought-after trainer through the Olympic level (arthur.kottas-heldenberg.at).