
One of the most important skills you can learn in dressage is riding every step. When you practice or perform a movement, instead of telling yourself, for example, “then I’ll ride a shoulder-in,” break the movement down into parts: the beginning, middle and end. Then ride every step of each of those parts.
To watch a free video of AnnA Buffini’s Magic Square exercise on Dressage Today OnDemand, click here.
One of my favorite exercises for developing this skill is the Magic Square: cantering a square (or sometimes more of a rectangle) with 90-degree turns or, if you’re an upper-level rider, with quarter-pirouettes at each corner. This is harder to do well than it sounds. For starters, the 90-degree turns demand a level of accuracy that is rarely required in tests. We see it only, for example, when you are asked to turn right at B and then right at X before a halt on the centerline or in the passage before turning and transitioning to piaffe. In contrast, when we ride through regular corners, we round out the track as if we’re riding a quarter of a 10-meter circle (or an even bigger circle at the lower levels).
To ride a 90-degree turn—or as close as you can possibly get to that—you need to imagine your horse’s body bending around that angle one section at a time: first with his head and neck, then with his shoulders, withers and torso, and then, finally, with his haunches. This means that you have to be in control of every part of his body, which takes a great deal of self-discipline on your part. It also means that he has to understand correct collection: compressing his body and maneuvering it in a smaller space, taking shorter steps that are never slower than the tempo of his regular canter—if anything, they are slightly quicker. At the same time, you will learn how much leg and hand it takes to help your horse produce collection.
By mastering this exercise, you will also improve your overall straightness, as well as the accuracy and quality of your turns (and circles and serpentines). Instead of meandering around your turns, with your horse sometimes falling to the inside or outside, you’ll know how to prepare better for each turn with effective half-halts and maintain the track and balance every step of the way around it. Unlike riding a circle, in which you can sometimes establish the initial bend and track and then let the horse take it from there, you can’t ever cheat on the square. You have to be 10 times more vigilant to keep him balanced and accurate on the turns and absolutely straight on the lines between them. This, in turn, will teach you to perform more effective half-halts, set up your horse better for every movement and discover any details within movements that need improving.
The beauty of this exercise is that it can be performed at any level, so long as your horse is familiar with basic bending aids. In general, the more experienced your horse is, the smaller you can make the square, though I would never make it smaller than about 10 meters on each side. If he hasn’t learned collection yet, this is a simple way to introduce the concept. If he is nearing the upper levels, this exercise will add to the foundation necessary to get him there. If he’s a confirmed upper-level horse, you can use the square to fine-tune his collection, balance and responsiveness to your aids, while zeroing in on very specific aspects of his pirouette skills. For example, if he’s a little sluggish with his left hind leg in his left pirouettes, you can focus on that leg in each turn of this exercise.
To get the most out of the Magic Square, match the degree of difficulty to your horse’s level of education and natural talent. Some horses find this exercise harder than others, but all of them can learn it given enough time and practice. I’ll describe two different versions of the exercise in this article—one for a lower-level horse and one for a Grand Prix horse. Keep in mind that the repeated turning and “sitting” (shifting weight onto the hindquarters for the 90-degree turns or quarter-pirouettes) can be physically taxing, so don’t overdo this exercise. Only practice a few repetitions in each session—for no more than about five minutes on each lead. If your horse becomes tense, leave the square and ride larger, easier figures or go to a bigger rectangle with rounder corners until he relaxes again. Then reintroduce the idea of a near-90-degree turn on a large square and gradually make it tighter (smaller) over time.
To make it easier for your horse to grasp the concept mentally, start this exercise on his better lead. Once he gets it, take a walk break and then try it on his harder lead. He may find this side more physically difficult, which can be frustrating and stressful, so spend less time on it, especially in the early stages. Trust that he will figure out the harder side eventually, so long as you don’t rush the process.
Most importantly, lavish your horse with pats and praise whenever he demonstrates that he’s getting the idea. Don’t ask him to be perfect in the beginning. The more you positively reinforce any effort to do it correctly, the more quickly he’ll progress. I often break out of the square after a horse performs two turns especially well, then give him a sugar and call it a day. No need to drill him if he’s just given his best effort.
This exercise is easiest to ride in a standard arena with clearly marked letters, but you can ride the square/rectangle just about anywhere. If you don’t have access to a dressage arena with letters, measure out the square dimensions on any flat surface and set up some sort of markers (overturned buckets, mounting block, etc.) at each corner, so you have visuals to aim for.
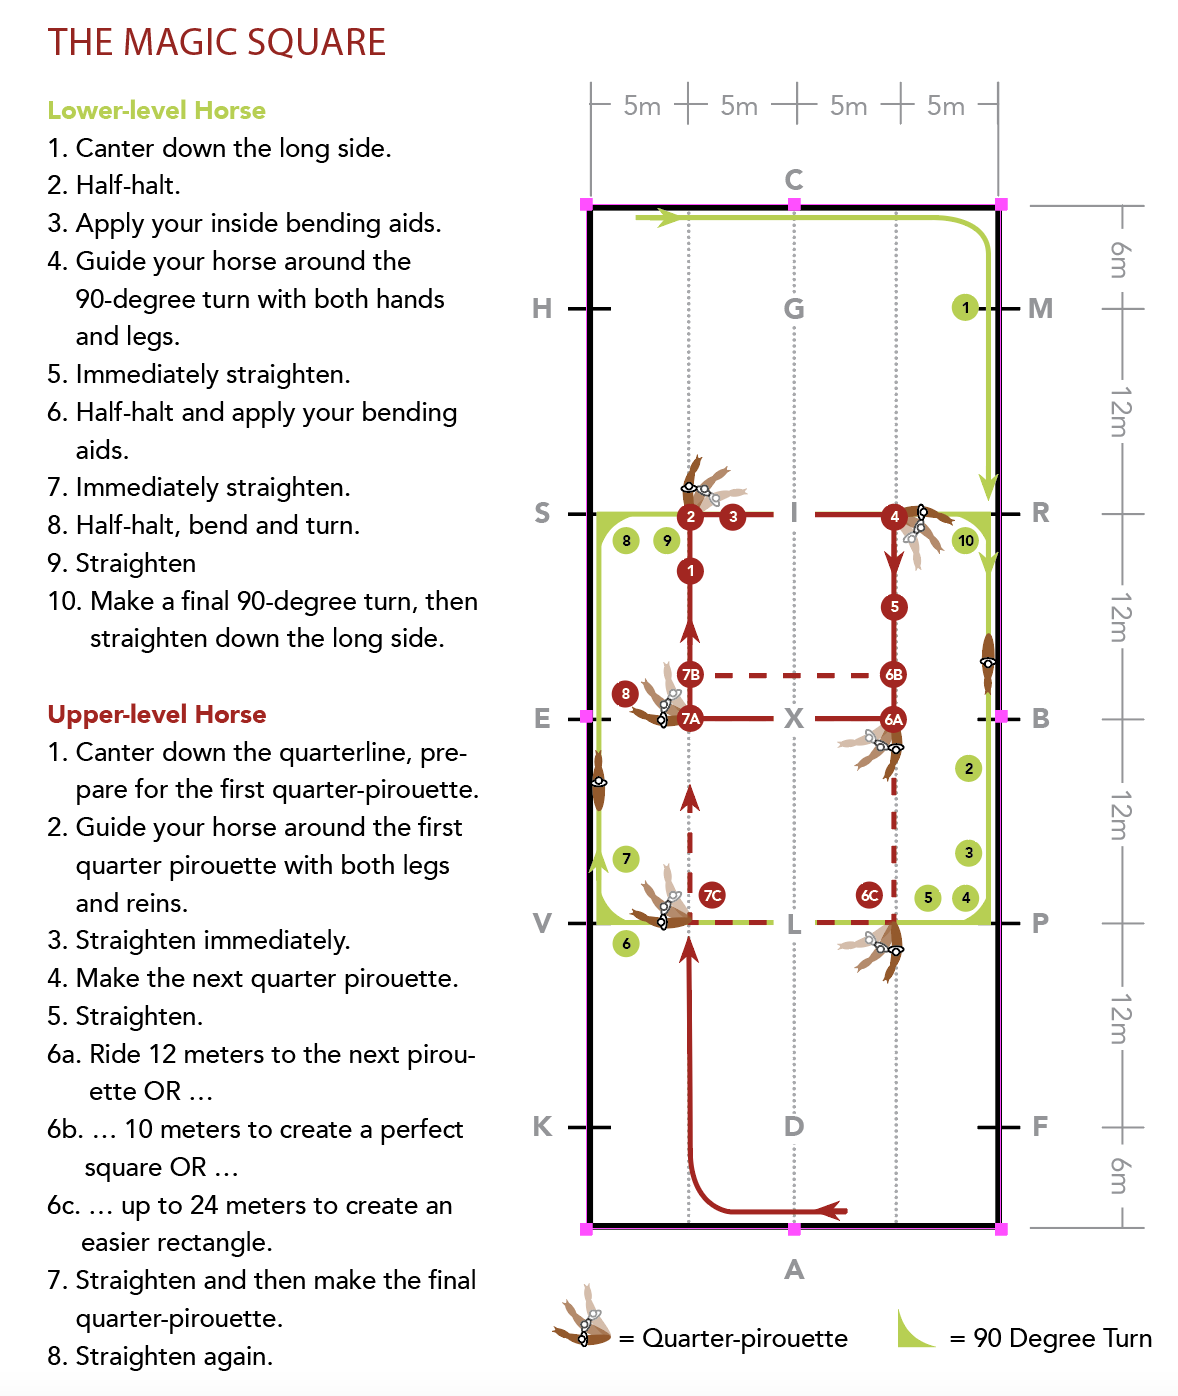
Lower-level Horse
Canter a 24m x 20m Rectangle with 90-Degree Turns
Before beginning this exercise, warm up at the walk, trot and canter. Then take a walk break before picking up the canter on your horse’s better lead. On the next long side, ask him to lengthen his stride. After a few strides, make a half-halt by closing your fists around the reins while simultaneously closing your calves on his sides to bring him back to a regular canter or a slightly collected canter (if he’s learned how to do that) for another two or three strides. Continue lengthening and shortening the stride until you reach the end of the long side. Repeat this on the next long side.
This forward-and-back preparation will confirm that your horse is well connected between your legs and hands. If he’s sluggish responding to your leg aids, reinforce them with a touch of the spur, a cluck and/or tap of the whip. If he gets strong in the bridle and doesn’t respond promptly to your half-halt aids, bring your elbows backward about a centimeter while keeping them and your hands low. If he still doesn’t respond, instead of holding the half-halt longer—which is never effective—soften the contact momentarily and then make another half-halt. It’s always better to give a thousand small half-halts than 10 big ones.
At the end of every half-halt, when you soften your rein contact, release just as much pressure as you added, but not so much that you lose the connection to your horse’s mouth. This is key. You must maintain the contact with his mouth throughout this entire exercise to support the collection and stay in control of his body. Even if he breaks to the trot, keep the connection. Just add more leg to make up for the loss
of momentum.
1 To begin the square, canter about halfway down the next long side.
2 A few strides before the second-to-last letter (R, S, V or P, depending on what direction you’re traveling), make a half-halt and ask your horse to collect his stride as much as he is able to.
3 Then prepare to make the first 90-degree turn exactly at that letter by squeezing your inside leg at the girth, keeping your outside leg closed on his side just behind the girth, asking for an inside flexion with your inside rein and maintaining a steady contact with your outside rein. (Remember, no loops in the reins!)
At the same time, check that you are sitting deep in the middle of the saddle, with your upper body tall and centered over your seat. Drop your heels downward, bring your shoulders back and keep your hands low. Turn your shoulders softly to the inside while pointing your chin through your horse’s ears. It’s OK to look farther around the turn with your eyes, but be careful not to rotate your shoulders too much. This can encourage you to lean your upper body in one direction or the other, which your horse will then mirror by leaning his body. Similarly, if you turn your chin too far in the direction of the turn, that can shift the rest of your body out of balance, creating a ripple effect in your horse’s balance.
4 Guide your horse around the turn with an opening inside rein (bringing your inside hand an inch or two toward the inside of the turn—for example, to the right if you’re turning right). Think of using both reins and both legs to curve his body around your inside leg, as if it were a fence post. Be sure that all parts of your legs—calves, knees and upper thighs—are closed around him, reminding him to maintain a steady tempo. Feel the beat of the canter and try to keep it exactly the same throughout the turn.
5 When you are facing the opposite side of the arena, immediately square your shoulders to it and even out your reins and legs to straighten your horse. Timing is critical here. If you wait 10 meters to straighten him, you won’t have time to prepare for the next 90-degree turn. Again, use both reins and legs to align his body and aim him toward the letter directly opposite the first one you turned at (for example, if you were cantering right and began the square at P, you will now be aiming for V). Be strict with yourself here. Ride a straight line! No drifting right or left, even for a single stride.
6 A few strides before the next letter, do exactly what you did before the previous turn. Make a half-halt to collect the canter, then apply your bending aids to produce as close to a 90-degree turn as possible.
7 Just as you did with the last turn, straighten your horse the moment his body faces down the long side. Then canter a straight line to the letter that is second from the end (in this example, S). Because of the dimensions of the arena, which create 24 meters between these letters, you’ll have a little more time to prepare for the next turn than you did on the straight line across the arena, so make this next turn really count.
8 Just as you did before, make a clear half-halt, using connected aids to communicate with your horse every stride of the turn.
9 Again, straighten quickly after the turn and ride an absolutely straight line across the arena to the opposite letter (in this case, R).
10 Make another collected, precise turn and then canter straight down the long side. At this point, if all is going well and your horse doesn’t seem tired or tense, ride around the arena to the other long side and initiate another square there.
As you perform each turn of the square, challenge yourself to make it as close to a 90-degree angle as possible. Over time, as your horse gets stronger and more responsive to your aids, you can gradually make the square smaller. Instead of riding the entire width of the arena, you can ride from the long side to the far quarterline and, instead of riding the length of two segments between letters, you can narrow that down to one. Eventually, you can ride the exercise from quarterline to quarterline, making the length of each side of the square 10 meters long, or allowing just a bit more length along the quarterlines to make more of a 10-meter-by-12-meter rectangle.
Troubleshooting
- If you find yourself repeatedly overshooting the turn and having to angle back to the next letter, check that you have enough connection through both reins. Imagine that your reins are straight, solid sticks extending from your knuckles to your horse’s mouth. By keeping them on either side of his neck, you can control his shoulders, bringing them around the turn quickly. This problem might be a sign that the exercise is too physically challenging for your horse, so to make it a little more forgiving, ride the sharp turns for only two of the corners of the square. Make the other two rounder, more like riding through a regular arena corner.
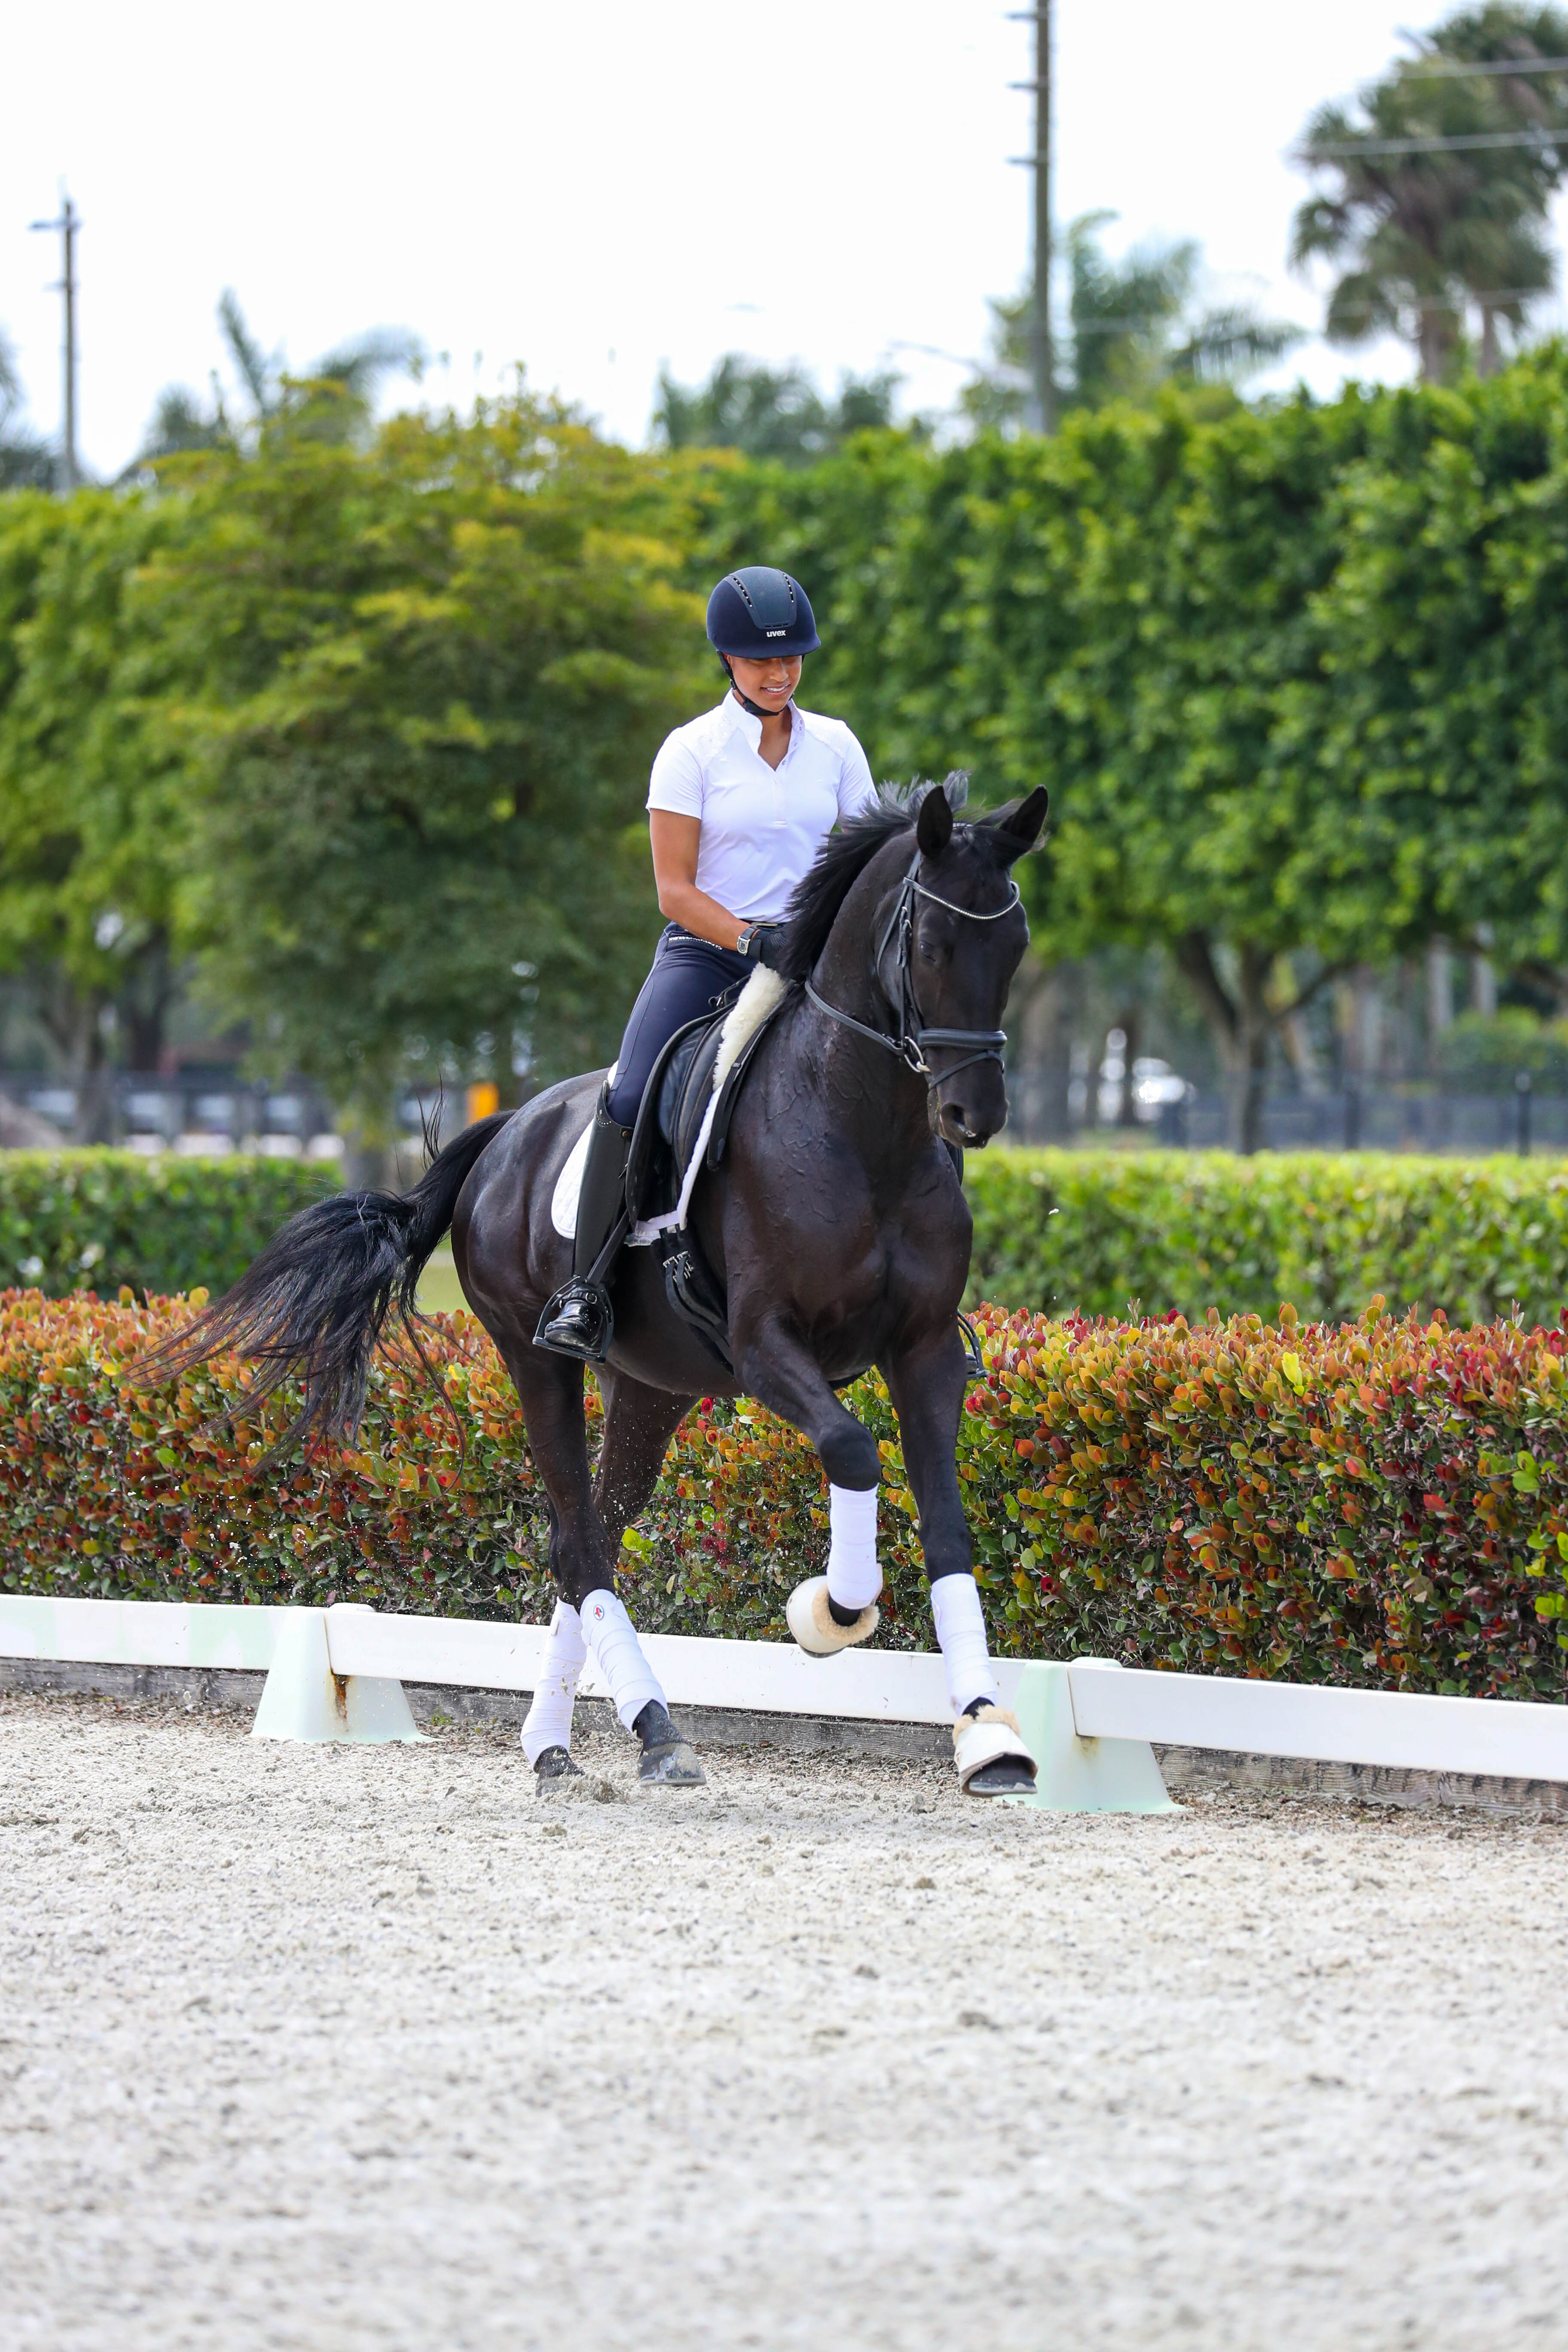
- Don’t lean in on the turns (as I’m doing here on my 4-year-old Hanoverian, Faith)! Doing so will cause your horse to lean in as well, as you see Faith doing here. To correct this problem, always check that your hips and shoulders are level (not collapsing to either side) and your upper body is tall and balanced over the middle of the saddle.
- If you notice that your horse’s hindquarters tend to drift outward on the turns, use a firmer outside leg aid to press them back in line with his body.
- If his hindquarters tend to drift to the inside, prepare for the turn with a few steps of shoulder-fore (a modified version of shoulder-in that asks for a bit more inside flexion than normal and a slight positioning of the shoulders to the inside).
©Susan J. Stickle
Upper-level Horse
Canter a 10m x 10m Square with Quarter-Pirouette Turns
This is essentially a smaller, more collected version of the lower-level exercise that replaces the 90-degree turns with quarter-pirouettes. Start with a more dramatic forward-and-back warm-up down the long sides of the arena, asking for three strides of extended canter alternating with three strides of “pirouette canter” (collected enough to perform a pirouette).
Then turn down a quarterline and canter about half to two-thirds down it before initiating the first quarter-pirouette.
You can use the letters for visual guidance and either create more of a 10-meter-by-12-meter rectangle or turn slightly inside the letters to make the exercise a perfect square.
1 For example, if you cantered past A on your right lead and turned down the next quarterline, you could plan to initiate the first quarter-pirouette between S and I. A few strides before that point, make a clear half halt, closing the fingers of both hands around the reins and maintaining your horse’s energy with your calves on his sides.
2 Then guide him around the quarter-pirouette with both legs and reins.
3 Straighten immediately and ride to the other quarterline …
4 … where you’ll make the next quarter-pirouette between I and R.
5 Then ride straight down that to …
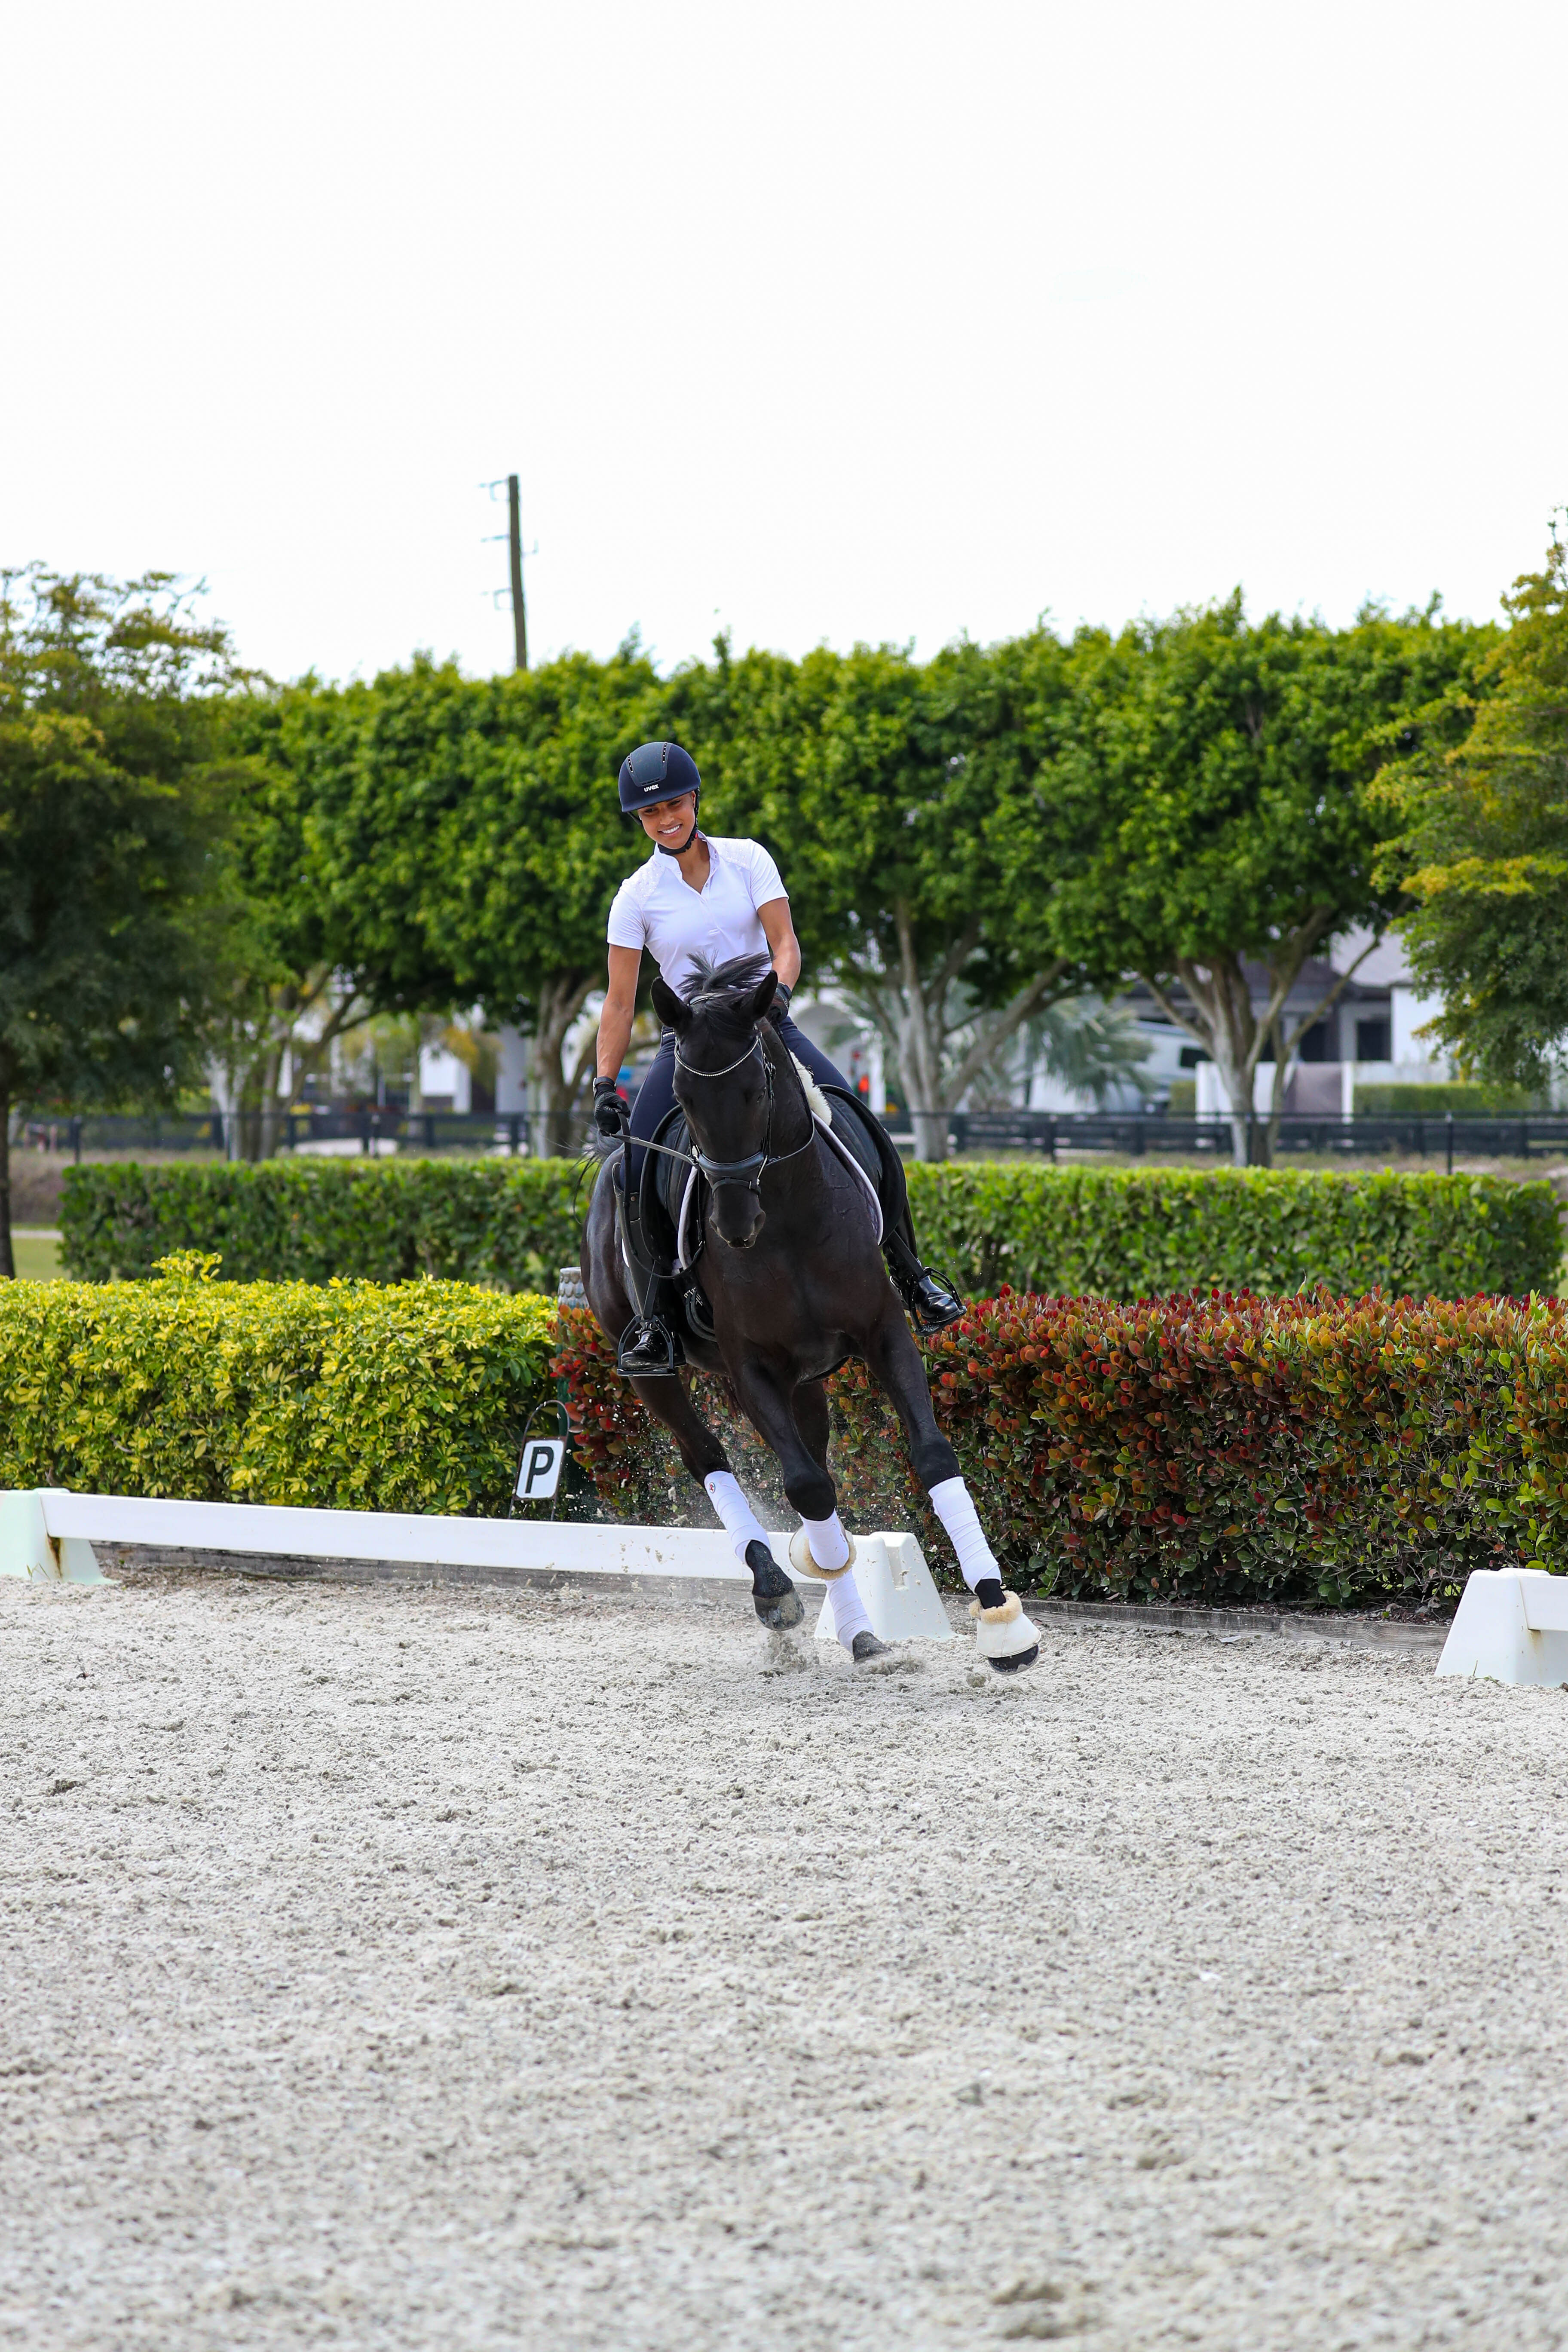
6 … the next quarter-pirouette between B and X. If your horse is tiring or growing tense or is performing so well that you want to give him a small reward, extend the square into a rectangle, as I’m doing here with Diva, making the next quarter-pirouette between P and L.
7 After that, ride straight across the arena to the original quarterline and make a final quarter-pirouette there.
8 (Not pictured) Straighten again and canter down the quarterline.
Ask your horse to perform each quarter-pirouette so that his hind feet stay in the same place as he rotates his body around them. This will line him up perfectly for the next straightaway. All of my tips for riding the lower-level square accurately apply in this version as well. Focus on each part of the exercise: making a good half-halt before the quarter-pirouette so you enter that movement balanced and collected, using your legs to maintain the same tempo throughout the quarter-pirouette, then completing the movement exactly where you need to be to ride straight to the next corner of the square. Feel the rhythm of the quarter-pirouette. It usually takes about three strides and should be as rhythmic as a metronome. Be ready to speed your horse up or slow him down however necessary, making each quarter-pirouette identical. As with any movement, focus on the quality of every step.
Performing this exercise correctly at this level demands a lot of power from both horse and rider. Because the square is smaller, there’s almost no time between when you straighten out after one quarter-pirouette and when you have to start collecting again for the next. Don’t be surprised if your upper legs start to burn while you ride this exercise with a Grand Prix horse. (Mine always do!)
Whatever degree of difficulty you choose to match your horse’s level of training, a great test is to perform this exercise on a groomed arena. The track you leave in the footing should be a perfect square (or rectangle). If you can nail that, you’re on your way to even greater achievements!
About AnnA Buffini
Up-and-coming dressage star AnnA Buffini comes from a family of world-class athletes. Her mother was on the 1988 U.S. Olympic volleyball team, and her father, a native of Ireland, was a national collegiate soccer champion. AnnA initially pursued her own Olympic dreams as a gymnast but switched to dressage at about age 9. In 2016, she became the first rider to win both the championship and reserve championship titles in the U.S. Equestrian Federation Young Adult “Brentina Cup” Dressage National Championship. Now running her own teaching, training and sales business based in San Diego, AnnA was named to the U.S. team for the Nations Cup competition in France this May with her current Grand Prix partner, Davinia La Douce (pictured here in the upper-level version of this exercise).
This article originally appeared in the Summer 2021 issue of Practical Horseman.