Though many feel confused when presented with a 20-by-60-meter rectangle surrounded by random letters, the large dressage arena is an indispensable training tool.
To understand this space is to add accuracy to your figures, precision to your riding and quality to your work. In the following article, we will review the arena’s layout and prove its value by showing you where to place a 20-meter circle. With these tools, you will be on the road to better riding and be better prepared to study the next article on figure eights and serpentines.
As an Amazon Associate, Dressage Today may earn an affiliate commission when you buy through links on our site. Products links are selected by Dressage Today editors.
Arena Measurements and Markers
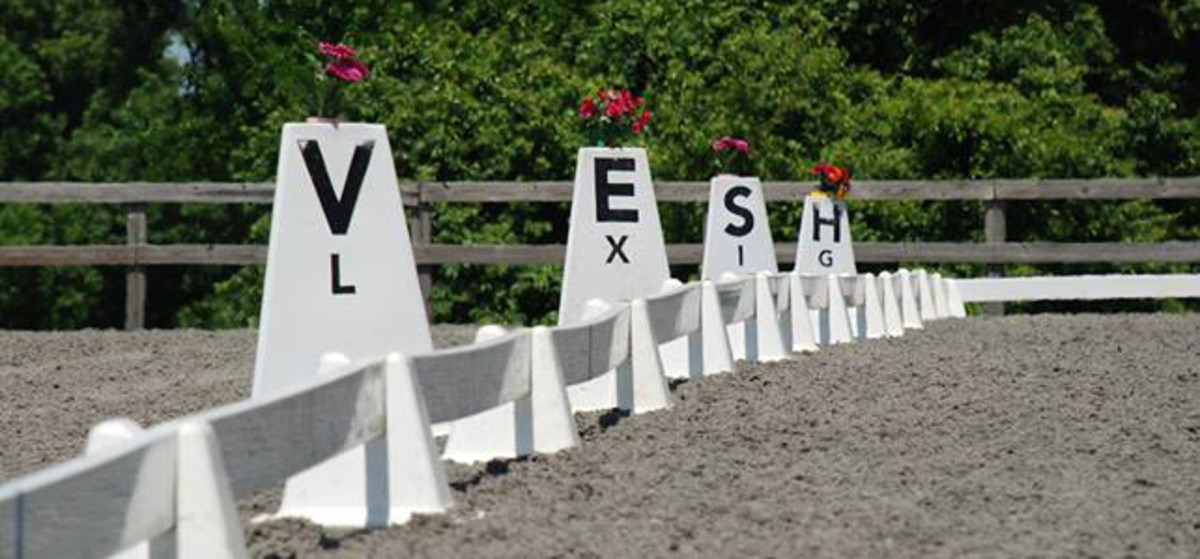
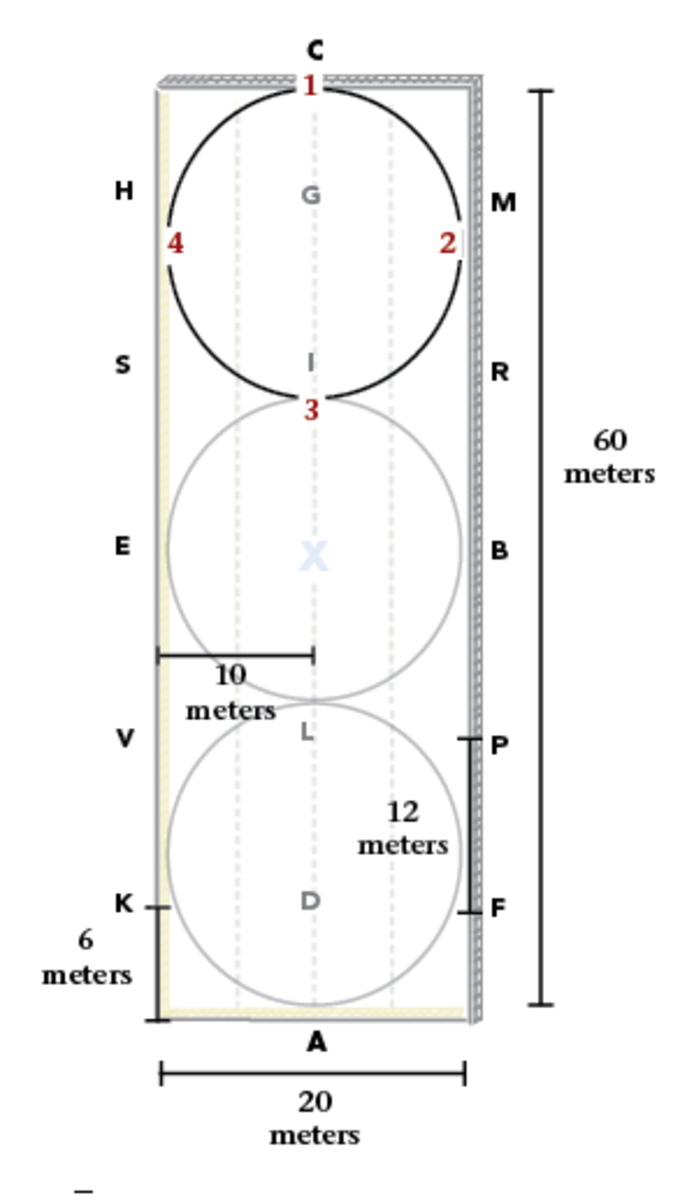
The large dressage arena is measured in meters—20 meters wide and 60 meters long (see illustration). It is surrounded by the letters (starting on the short side and traveling clockwise): C, M, R, B, P, F, A, K, V, E, S and H. Within the arena, unmarked, are the letters D, L, X, I and G. A simple internet search will yield multiple mnemonic devices for remembering this mysterious selection of letters.
What is consistent about these markers is the spacing between them:
C and A are 10 meters from their respective corners on the short side and exactly across from each other.
• G, M, F, D, K and H are 6 meters from their respective short sides.
• R, B, P, V, E, S, I, X and L sit 12 meters from the letters next to them.
• M, G and H sit in line with each other, parallel to the short side. As do R, I and S; B, X and E; P, L and V; and F, D and A.
Once you are comfortable with these measurements, you can ride movements like these circles more precisely. Here is how:
20-meter circle: Now that you are more familiar with the geometry of the arena, you can ride this foundation movement seen in all of the introductory dressage tests. This circle is essential for training and testing your horse’s line of travel and bendability as well as your effectiveness as a rider.
The 20-meter circle is commonly ridden in the center or either end of the arena. Regardless of its location, you can ride a clear circle by riding to four points, as if it were a diamond. Here is an example of how to ride this figure, illustrated by a circle at C on the right rein:
1. Begin Point 1 at C.
2. Ride a slightly sloped line. Aim to arrive at the track (Point 2) 10 meters from the corner (between C and M), 4 meters past M and 8 meters before R.
3. Ride a sloped line to Point 3 20 meters down the centerline from C—2 meters past I.
4. Continue your sloped line to Point 4. Aim 8 meters past S, as you are approaching. Again, the point you arrive at the track should be 4 meters from the corner letter (H).
5. Return to point 1 at C.
For the circle at A, Point 1 is at A, Point 2 is 4 meters past K, Point 3 is 2 meters past L and Point 4 is 4 meters before F.
The center circle is easier if you know that two of the points are at B and E, while the other two share the same points 2 meters from I and L that we use in the other two circles.
Mark these points with flexible training cones on either side as you are learning these somewhat awkward locations. Make it a point to ride straight between the cones for accuracy, but only for a few strides. Otherwise, you will be riding a diamond or a rounded square.
With a lot of review and mounted practice, you will be more comfortable with the geometric figures. Once your knowledge of the arena letters and spacing, as well as your circles, are mastered, you will be ready for next month’s figure eights and serpentines. Happy riding!
This article originally appeared in the January 2014 issue of Dressage Today as part of a monthly series on Dressage 101 topics.
Click here to read more articles from Hilary Moore Hebert.
Hilary Moore Hebert is a professional dressage trainer with clients from green to FEI. A USDF bronze and silver medalist, as well as “L” Education Program graduate, she owns and operates Moore Hebert Dressage at Alsikkan Farm in Germantown, Maryland.
