A fantastic flying change in dressage is a lot like a fabulous jumping effort in the hunter ring. All of the following characteristics stay the same before, during and after the change, just like they do in a hunter jump:
- the quality and rhythm of the canter
- the horse’s balance
- the straightness through his body and the straightness of the track
- the “throughness” over his back (supple connection from his hindquarters, over his topline to the bit)
- the confidence and relaxation
© Susan J. Stickle
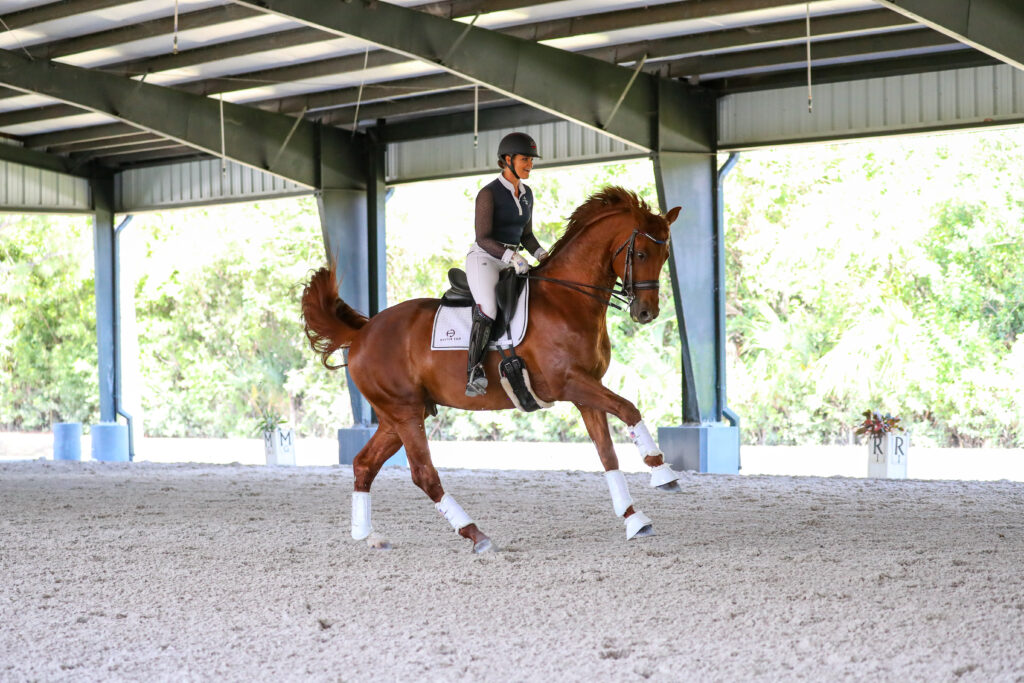
In a great flying change, the timing is impeccable with the horse executing promptly in response to the rider’s subtle yet clear aids. In the air, the horse’s shape is round, and the rider sits quietly in the middle of the saddle, making no dramatic moves to detract the eye from the horse’s athletic, balanced and powerful effort. And, to maximize scores from the judges, the horse’s changes are equally correct and impressive from both leads.
Unlike hunter flying changes (which are much subtler than their jumping efforts), ideal dressage flying changes are big, expressive and uphill. The front legs appear to reach upward and outward dramatically, and there’s a visible “jump” in the canter stride. In addition, the front and hind legs always change at the same time. This is commonly known as a “clean change.”
Single flying changes are introduced at the Third Level and in the Young Horse Test for Six-Year-Olds, but you can introduce them at any age, so long as your horse has the basic prerequisites described below. As he progresses through the levels, he will eventually graduate to tempi changes—making flying changes every four strides, every three, every two and, finally, every stride. How well he performs these changes at each level of his training comes down to one simple rule: Quality changes come from a quality canter. Here, I will explain why and share my favorite exercise for improving the canter quality.
Canter Fundamentals
A quality canter has a clear three-beat rhythm and is balanced, supple and relaxed, with a good acceptance of the rein contact. (Check the directives in your dressage tests for more specific desired qualities at your level.) But that doesn’t mean that talented horses will always get higher scores on their flying changes than less talented horses. As with all dressage movements, training matters as much as talent. A horse who has a 7 canter but produces accurate, obedient changes can outscore a horse with an 8 or 9 canter whose changes are crooked, late and/or asymmetrical (better in one direction than the other). So, teaching a young horse to produce “wow” changes or fixing an older horse’s problematic changes is all about going back to basics and finding the holes in his training. Sometimes those holes are very small and hard to identify. Your job is to keep investigating until you find which ones are holding your horse back from performing his best.
Four of the most important basics to focus on are:
- walk–canter and canter–walk transitions
- longitudinal suppleness—elasticity and flexibility through his entire body from his haunches, over his back and to his head
- lateral suppleness—ability to bend equally well to the left and right
- even contact between the two reins and the bit
The walk–canter transition tests whether your horse has the strength and carrying power to perform a flying change. The aids for this transition are essentially the same as the aids for flying changes, so practicing it creates the necessary sensitivity and promptness for his response to your flying change cue. Practicing canter–walk transitions teaches your horse to respond to the half-halt and take weight onto his hind legs in preparation for you to deliver the flying change aids.
No matter what discipline you’re in or what level you are, if you’ve mastered the walk–canter and canter–walk transitions, your horse will be more obedient and responsive to your aids for flying changes. Exactly what aids you use are a matter of personal preference. What’s important is that you use the same ones every time you ask for these transitions. That consistency will pay off when you’re ready to ask for flying changes.
To rock his body back onto his haunches and lift it high enough into the air to change his front legs and hind legs at the same time, a horse needs to be longitudinally supple. If he is strung out on his forehand, he can’t produce a good change. Similarly, if he’s not laterally supple, he won’t be able to stay straight on the track and straight through his body for a clean change. My ultimate goal is to make my horses so supple that they feel like “yoga pretzels”—able to move their bodies in any way I want them to. The more supple they are, the bigger and more expressive their flying changes are.
Create a Yoga Pretzel
The exercise I’m going to describe in this article will help you achieve that yoga pretzel quality while also serving as an excellent diagnostic tool to identify and repair the missing links in your horse’s training, no matter what level you ride. I’ve broken it down into sections. Practice each section over however many days, weeks or months it takes for your horse to do it confidently and comfortably before adding the next section.
When you come across a problem—for example, your horse anticipates the change before you apply the aids for it, breaks to the trot, hollows his back, throws his head up, grabs the bit, etc.—that’s a win! It shows what you need to work on. Ninety-eight percent of the time, the problem will correlate to his weaker lead. Every horse has a strong lead and a weak lead. This exercise will help you strengthen the weaker lead. It will also give you more “buttons” to push, improving your control over your horse and his responsiveness to your aids.
Whatever mistakes he makes, don’t punish him. He just doesn’t know how to answer your questions appropriately yet. Gently correct him by transitioning to walk or trot and pick up the canter lead you want again. Then repeat that part of the exercise until he can perform it properly.
If your horse is young and/or not advanced enough in his training to learn flying changes, you can still practice some of the early parts of this exercise. They will prepare him for later in his career, making the flying change introduction no big deal. I recommend practicing the exercise on his easier lead first to build up his confidence and understanding before doing it on his more difficult lead. With an experienced horse, you might want to do the opposite: Start with the harder lead first. That way you can zero in on his training issues before his body fatigues. This exercise is much like lifting weights in the gym. If you do too many reps too soon, your muscles get tired and sore.
How many times you repeat the exercise also depends on your horse. In general, a little goes a long way. If he tends to get tense or discouraged with repetition, teach it to him in multiple shorter sessions over a longer period of time. If he grows more confident through repetition, make the sessions a bit longer. With all horses, I recommend taking lots of walk breaks on a long rein. Keeping your horse relaxed and happy is essential, so take each walk break before he needs it (before he gets tense or frustrated). And always quit while you’re ahead. Small wins make for large wins later on.
In addition to being able to perform consistent walk–canter transitions on both leads, this exercise has only two other prerequisites:
- You must be able to ride a counter-canter in both directions. The counter-canter is an excellent tool for improving the quality of the canter and the horse’s suppleness and straightness, so the better you can do it, the better your flying changes will be.
- You will also need to be comfortable riding in shoulder-fore: bringing your horse’s shoulders slightly to the inside of the track as if you were riding a shoulder-in but with less angle and a smaller degree of flexion.
Part 1: Counter-Canter Around Two Short Sides
1. Begin the exercise by riding a 20-meter circle on one end of the arena in a working to collected canter (depending on your horse’s level of training).
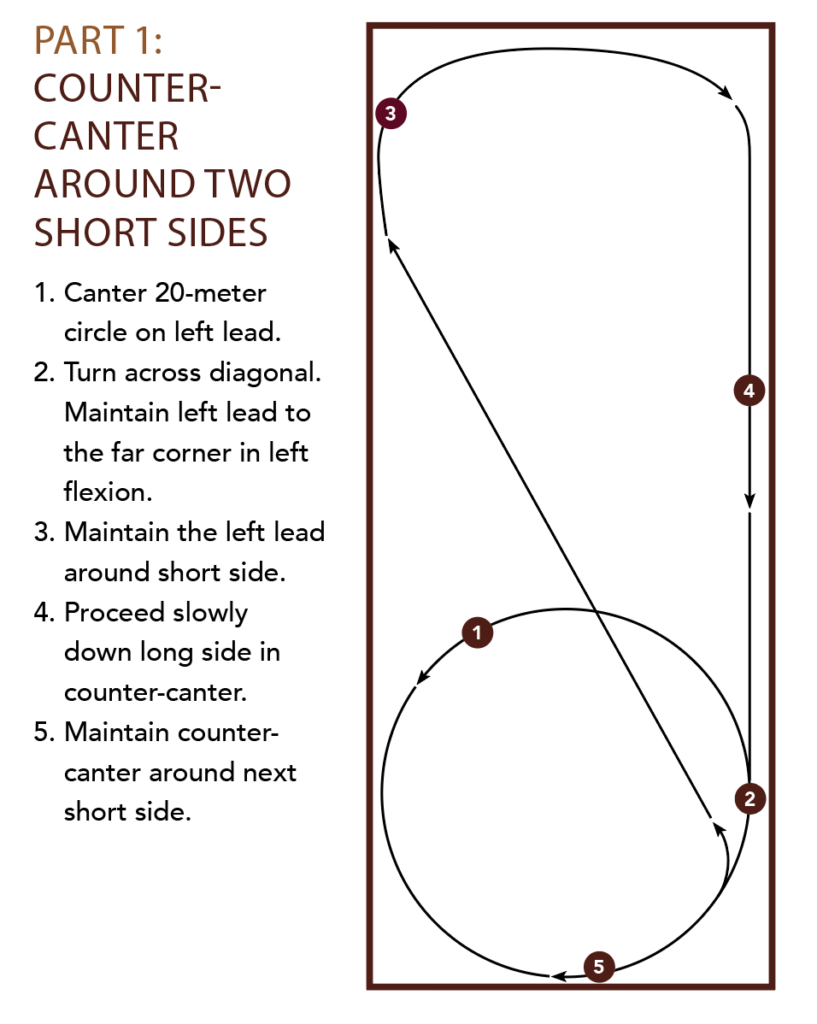
2. When you finish the circle, ride across the next diagonal. Continue all the way to the far corner without changing leads. This is your horse’s first test. He might be tempted to change leads without being asked to do so. Or he might lose his balance and break to the trot.
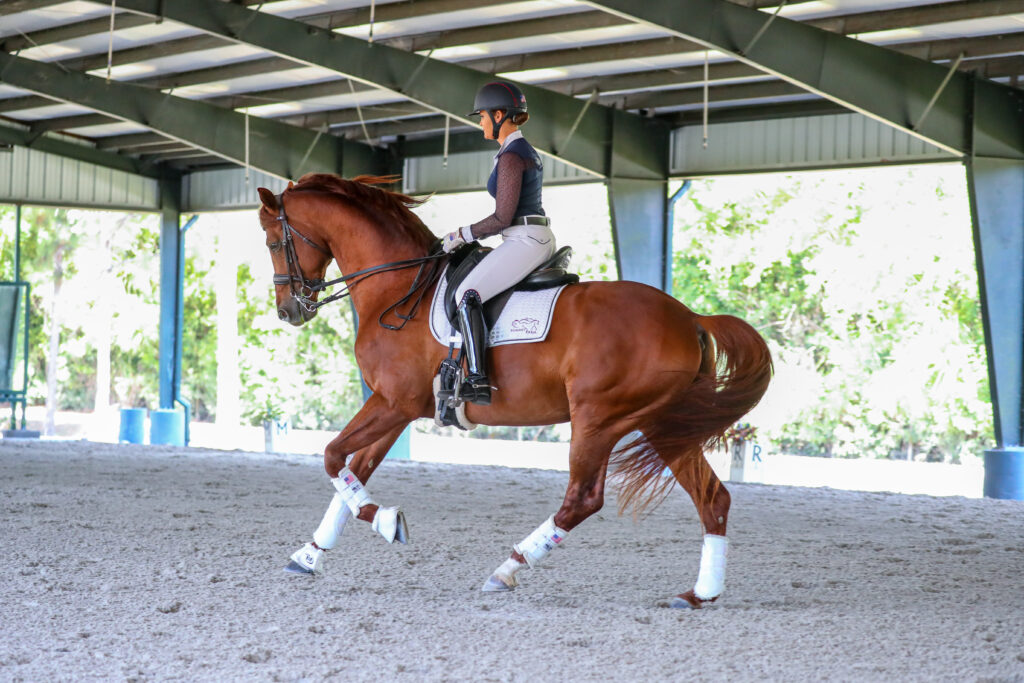
The key to preventing these mistakes—and to performing the rest of this exercise successfully—is to maintain your correct position in the saddle, which will remind your horse to stay on the original lead. So, for example, if you begin the exercise on the left lead, you should have slightly more weight on your left (inside) seat bone than on the right seat bone. Think of pressing your left seat bone toward the tree running through the center of the saddle. Your upper body should be tall, straight and balanced over the middle of the saddle, not leaning in either direction. Turn your shoulders slightly toward the direction of the bend, so that your breastbone faces your horse’s left ear. Your left leg should be at the girth, maintaining the left bend, and your right leg should be a few inches behind the girth, preventing the haunches from slipping to the outside.
For this part of the exercise, ask for a normal small degree of flexion to the inside. Keep an even contact on both reins, never crossing either hand over your horse’s neck. As you ride down the diagonal, continue to ask for that same inside flexion while maintaining your steady position in the saddle.
If your horse changes leads or loses his balance, calmly bring him down to a walk and then pick up the original lead again. (If this is too difficult for his level, return to the 20-meter circle and start the exercise over.)
© Susan J. Stickle
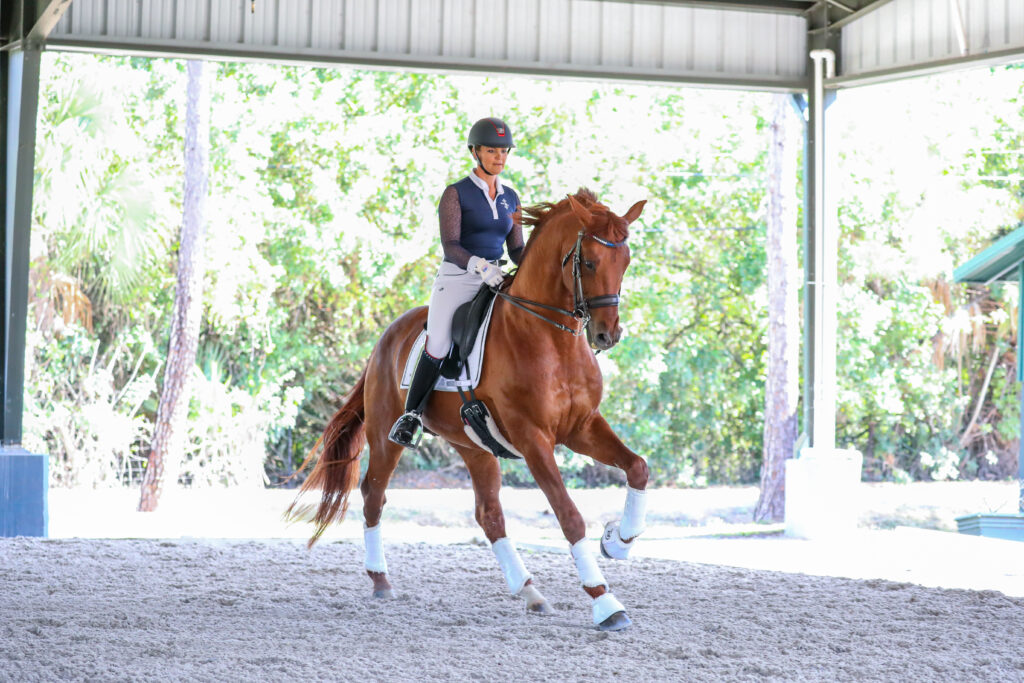
3. When you arrive at the far end of the diagonal successfully, continue around the short side in counter-canter. If your horse is Prix St. Georges level or above, ride into the corners. This requires more strength and balance than most lower-level horses have. So, if you’re on the latter, ride through the short side as if you were on a 20-meter circle. This will build his confidence and set him up for success.
As you ride around the short side, focus on your position and the quality of the canter, still with the same small degree of inside flexion and even contact on both reins. (By “inside flexion,” I’m referring to the inside of the bend—in this example, the left bend—not the inside of the arena.)
4. Then proceed down the long side slowly, keeping everything the same—don’t be in a rush!
5. Continue around the next short side just as you rode the previous one. By now, hopefully your horse will have gotten any bobbles out of the way and will be getting the hang of maintaining the counter-canter around the turns. Address any major mistakes with the gentle correction I described earlier.
© Susan J. Stickle
Part 2: Change the Flexion on the Long Side
1. When your horse can maintain a steady counter-canter around both short sides of the arena, continue down the next long side.
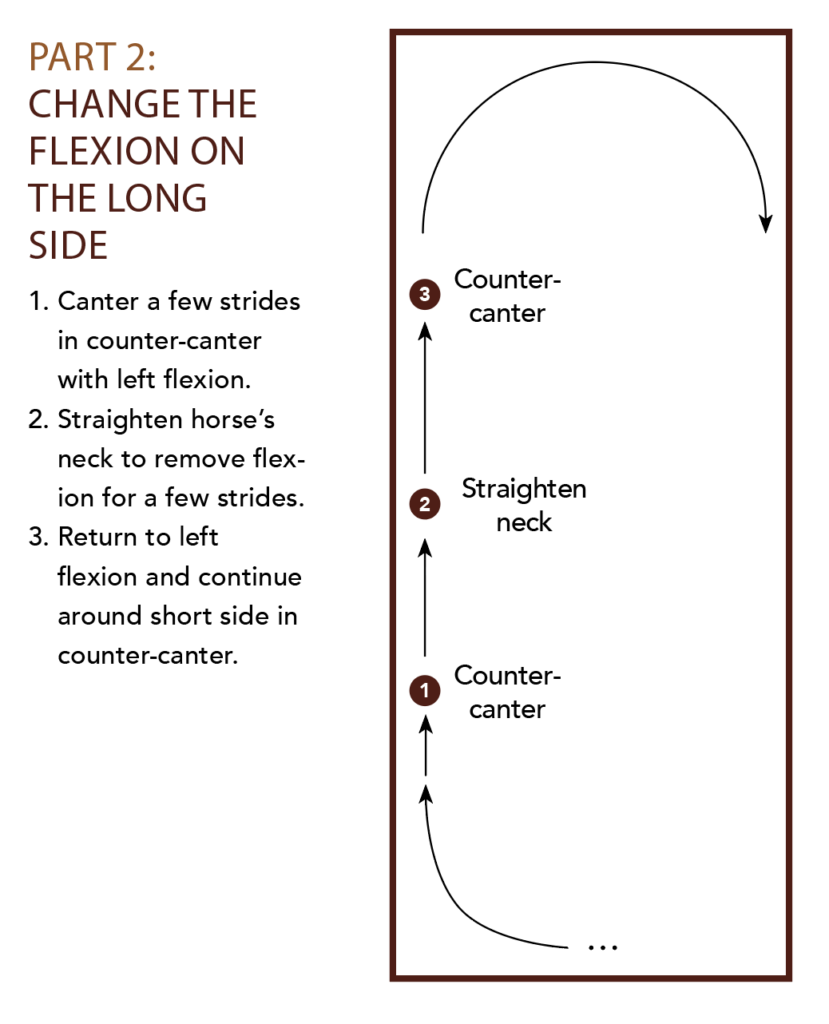
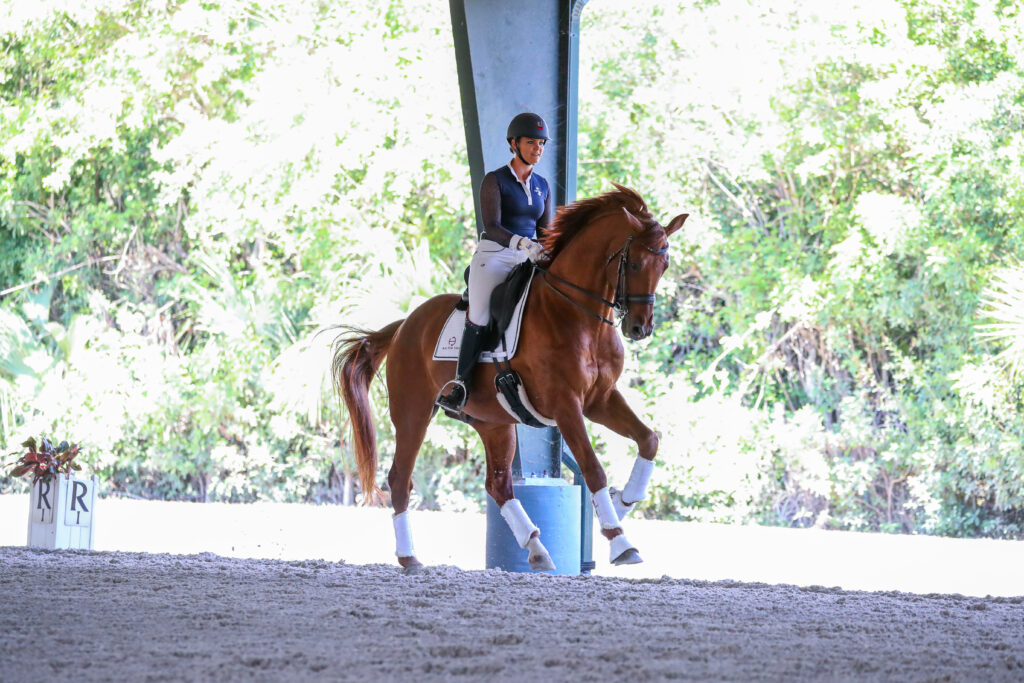
2. After a few strides, rotate your upper body slightly, so that your breastbone is now facing directly down the long side. As you do that, use your reins to guide your horse’s nose back toward the track until his neck is straight and parallel with the arena wall. Readjust your rein lengths as necessary to maintain an even contact on both reins. Continue to weight your inside seat bone (in this example, your left seat bone) more than your outside seat bone, and keep the position of your legs the same as before to remind him to stay in the counter-canter.
Don’t be surprised if your horse responds to the removal of flexion by changing leads or even breaking to trot. This is another test of his obedience to your aids, as well as of his strength and suppleness. Quietly bring your horse back to the walk, then pick up the counter-canter again. Continue in the normal flexion (in this example, the left) for a few strides, then check that your seat bones and legs are still clearly in position for that lead before trying to straighten the neck again for just a few strides.
© Susan J. Stickle
3. Repeat this down the rest of the long side: returning to normal flexion for a few strides, then straightening for a few strides, then back to flexion.
For younger and/or less experienced horses, this might be the best place to end the exercise. The next part requires more training and a good understanding of shoulder-fore.
Part 3: Shoulder-Fore in Counter-Canter
When your horse masters the above step and feels ready for a higher degree of difficulty, add an even more extreme positioning: shoulder-fore in counter-canter.
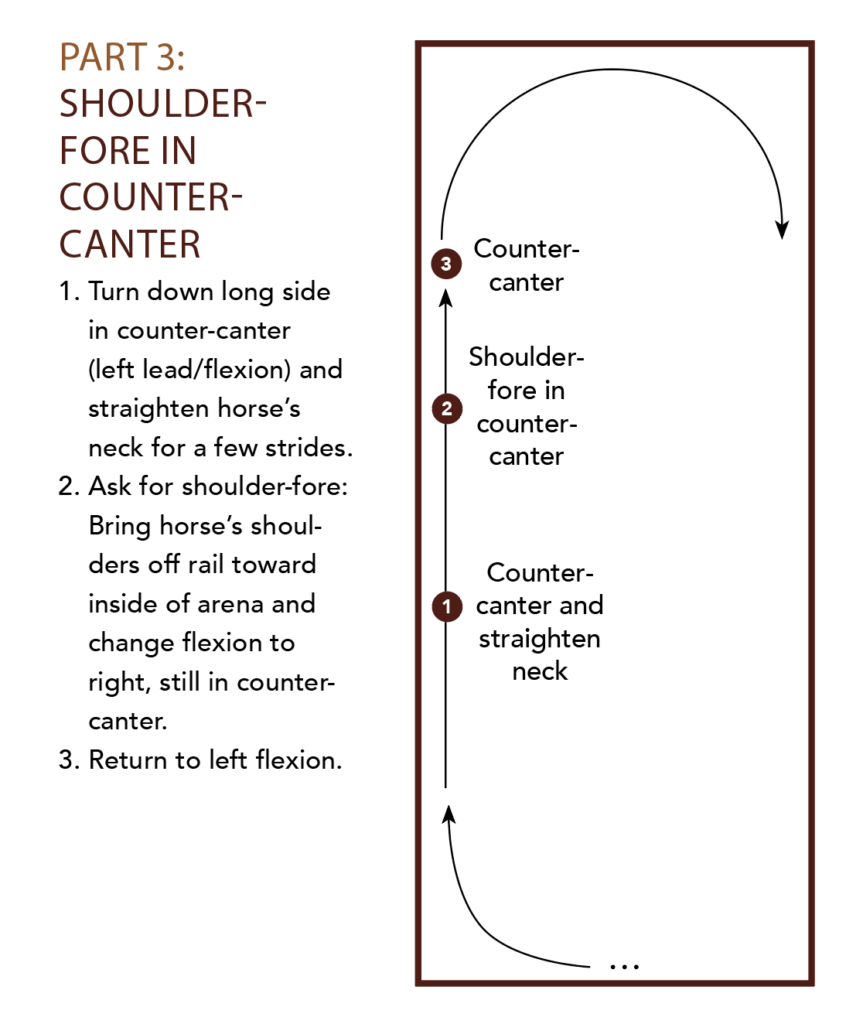
1. After turning down the long side and straightening your horse’s neck …
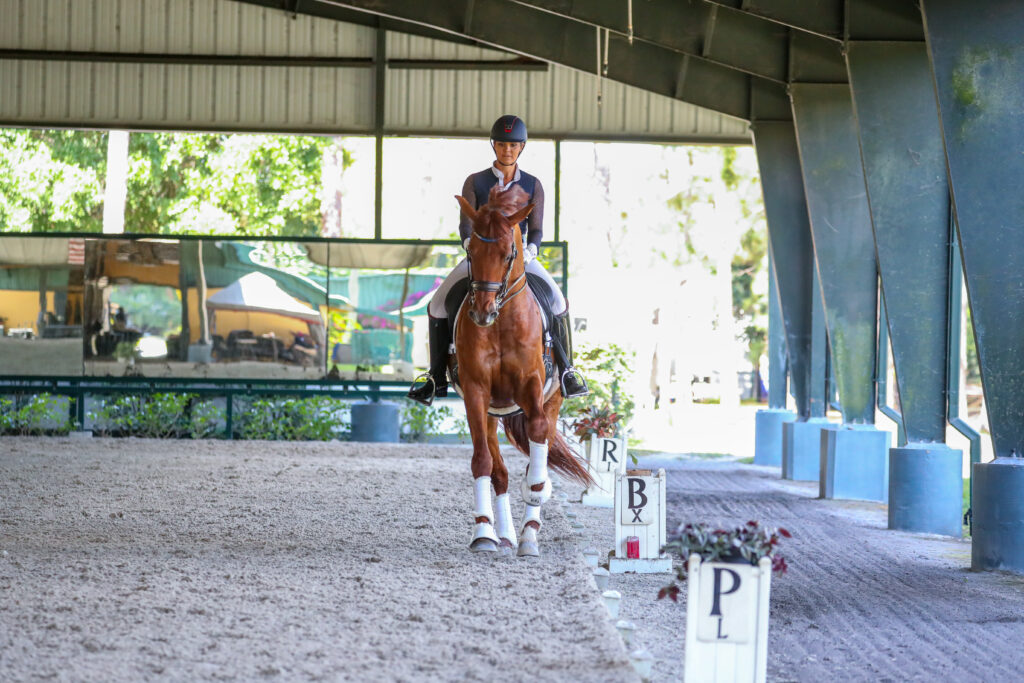
2. … lighten your inside seat bone (the one that was on the inside of the original bend, in this example, the left) slightly while turning your breastbone to face slightly toward the inside of the arena. As you do this, use your reins to guide your horse’s shoulders just to the inside of the track to perform a shoulder-fore. Now ask for a slight flexion in his neck and jaw toward the inside of the arena, while still using your legs to keep his haunches on the track and maintain the counter-canter lead. This is where you create the yoga pretzel: with the front of your horse’s body bent in one direction while the back of his body is bent in the other direction. So, for example, if you’re riding the left lead, ask for a slight flexion to the right while keeping your left leg on the girth to maintain the left bend through his barrel and pressing your right leg firmly behind the girth to prevent the haunches from slipping off the track toward the inside of the arena.
This is an even more challenging test. Remember not to overreact if your horse changes leads or loses his balance. Make a gentle correction and try again. If he ever feels tense or confused, go back to an earlier stage of the exercise and repeat that until he relaxes again.
© Susan J. Stickle
3. When you successfully achieve the shoulder-fore in counter-canter, ride it for a few strides before very slowly rotating your shoulders back toward the outside of the arena and guiding his neck back to the original flexion. Then ride in counter-canter around the short side of the arena and practice the shoulder-fore again on the next long side.
At this point, if you don’t feel like your horse is ready to try a flying change, either ride a simple change (transition to walk and then pick up the other lead) or ride around another short side in counter-canter and turn across the diagonal to return to a regular canter. Take a walk break, then repeat the entire exercise on the other lead.
Part 4: Flying Change!
When everything is going well up to this point and you’re ready to try a flying change, ride all of the steps you’ve done so far.
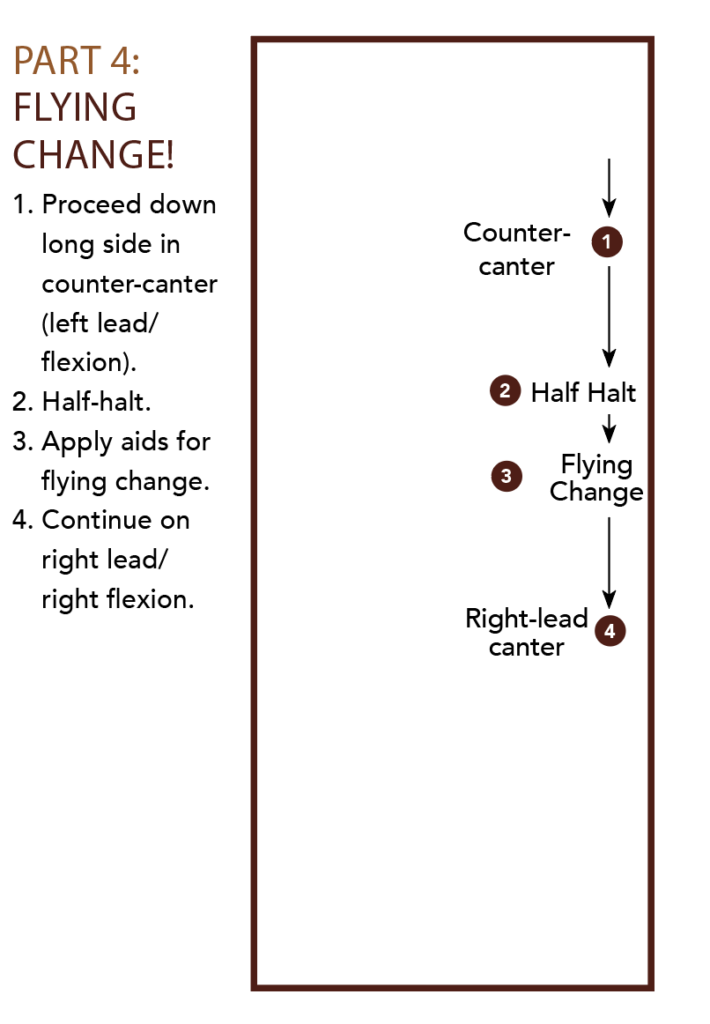
1. Perform the second counter-canter in shoulder-fore.
2. Perform a clear, rebalancing half-halt, using the same aids you’ve used for canter-walk transitions, still keeping your horse’s shoulders positioned slightly to the inside of the track. Tighten your core (the muscles in your stomach and lower back), close your upper legs against the saddle and bring your upper body 2 inches backward. At the same time, close your fingers around the reins to ask him to shift his weight back onto his hind legs. This is a very important step. It tells your horse that something new is coming. It also compresses his body, coiling it up in preparation for the flying change. Horses’ bodies often lengthen during counter-canter, losing that necessary collection. So, if you don’t feel the half-halt “go through”—produce the desired rebalancing weight shift—repeat it.
3. When you feel the half-halt go through, follow it with a distinct aid for the new canter lead, using the same aids you’ve used consistently in your walk–canter transitions. For me, that means bringing the leg that was behind the girth forward and moving the leg that was at the girth backward, while shifting weight over to the new inside seat bone. So, if you started on the left lead, bring your right leg forward, your left leg backward, and shift your weight onto your right seat bone to ask for a flying change to the right lead.
4. Continue on the right lead with right flexion.
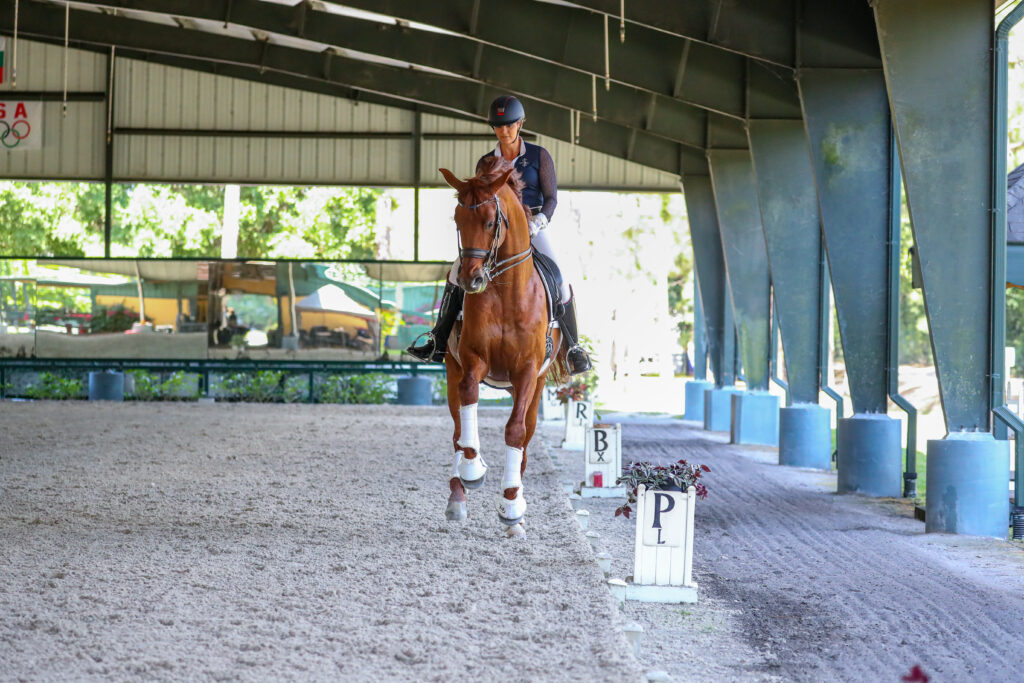
© Susan J. Stickle
For More Advanced Horses and Riders
If your horse is advanced enough to execute the entire exercise correctly in both directions, increase the degree of difficulty by incorporating transitions forward and back within the canter in all three positions: the regular counter-canter, the counter-canter with the straightened neck, and the counter-canter in shoulder-fore. Ask your horse to extend and collect his stride without losing the bend, throughness or connection. This is another great test, especially for horses who are a little stuck in their ways. Many horses try to change leads when you send them forward. If this happens, respond with the same gentle correction I described earlier. Eventually, he’ll learn to make the change only when you ask for it.
As you practice this exercise, you’ll gain more control over both sides of your horse, as well as his front and back, while he grows increasingly supple throughout his entire body. This ultimate yoga pretzel will set him up perfectly to produce his best flying changes.
What is a Flying Change?
According to the U.S. Equestrian Federation Rule Book, “The flying change is performed in one stride with the front and hind legs changing at the same moment. The change of the leading front and hind leg takes place during the moment of suspension. The aids should be precise and unobtrusive. Flying changes of lead can also be executed in series at every 4th, 3rd, 2nd, or at every stride. The horse, even in the series, remains light, calm and straight with lively impulsion, maintaining the same rhythm and balance throughout the series concerned. In order not to restrict or restrain the lightness, fluency and groundcover of the flying changes in series, enough impulsion must be maintained. Aims of flying changes: To show the reaction, sensitivity and obedience of the horse to the aids for the change of lead.”
About Sarah Tubman
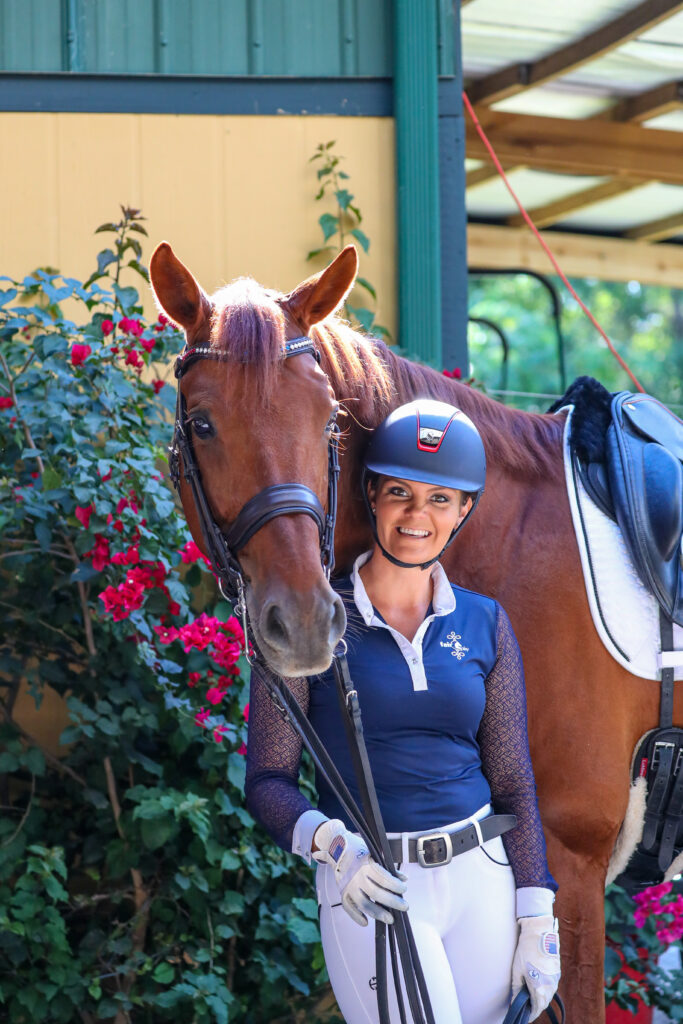
Sarah Tubman placed third in her first CCI*** three-day event at the age of 15 before deciding to concentrate on dressage. She operated the largest dressage sales business in Southern California and taught riders and horses from Training Level through Grand Prix for many years. In 2016, 21 horse-and-rider pairs in her program qualified for California Dressage Society/U.S. Dressage Federation championships. Two years later, she accepted the position of lead rider for Summit Farm, a high-performance training barn in Murrieta, California. Since then, she has partnered with several young stars in major competitions, including the 2019 Pan American Games, where she and the farm’s Dutch warmblood stallion First Apple won the individual gold and team silver medals. Sarah qualified four horses for the 2020 Dressage Young Horse Championships.
This article originally appeared in the Winter 2021 issue of Practical Horseman.


