
Let’s talk about equestrian rehabilitation or rehab through rider fitness exercises. Veterinarians have written a lot on how to rehabilitate our equine partners after various injuries whether they are trauma to soft tissue or changes in the skeletal or joint structures. However, many of us have ailments of our own that often hinder our performance in the saddle that require equestrian rehabilitation. In my horse sales adventures, I have frequently received calls from potential buyers who have had hip and knee replacements, rheumatoid arthritis, heart conditions, asthma, scoliosis, etc. Sometimes our maladies are temporary and can be improved and sometimes the condition is more permanent. Most often, as in life, riders are “a work in progress,” in that we hope to improve our limitations with rider fitness exercise, treatments, equestrian rehabilitation or surgical intervention.
Since I started riding as a 7-year-old horse-crazy little girl, I had no physical or mental limitations and would ride any horse in any tack under any conditions. That is until I experienced mind-numbing back pain following a day of judging a horseshow for eight hours from a metal chair with my legs crossed for most of the day. I went to see a chiropractor, Dr. Brad Weiss, who adjusted me, which yielded some relief but I still had tremendous, searing pain whenever I sat for more than 30 minutes at a time. After getting an MRI on my lower back, Dr. Weiss clipped the images onto the light box in his office and said, “Oh! That disc looks like a jelly donut that someone stepped on! I can’t help you with that. I will refer you to a pain specialist.” In retrospect, I believe that the training technique of my first dressage instructor of telling me to keep my shoulders “behind my hips” in arched back alignment to correct my hunter “hovering forward” seat 15 years ago was partly responsible for my herniated discs.
One week after getting my second epidural shot from the pain specialist to relieve the pain from the disc pressing incessantly on my sciatic nerve, my husband and I conceived our first child. I continued to ride and show my Grand Prix mount pregnant and with two herniated discs until I was five months pregnant. This should come as no surprise since horsewomen are really tough cookies and patch themselves up to crawl back into the saddle all the time, especially to show Grand Prix.
Fast forward to the delivery room. After carrying my son for 41 weeks, he was induced and 19 hours of labor with “failure to progress” finally ended in a c-section delivery. I really didn’t want to have my abdominal wall cut for several obvious reasons, not the least of which was the longer recovery and challenge to the core muscles required for riding. Two months after Benjamin was born, I was back on the operating table for a discectomy, laminectomy and spinal fusion of the L-4/L-5 and L5/S1. Basically, they scraped out two bad discs, inserted artificial discs, secured a supporting plate to the side of my spine with titanium screws and closed me back up with the intention that the three vertebrae would be fused together permanently. I also awakened from surgery with a condition called “drop foot” in my left foot, in which the nerves associated with foot extension or dorsiflexion are damaged.
During my pregnancy, I invested in personal Pilates sessions to improve my core strength and alignment. The techniques and exercises that I learned will stay in my toolbox for the rest of my riding career. Many other riders have sung the praises of Pilates for maintenance and core strength improvement. I also spent six months in post-operative physical therapy with Dr. Richard Asaro, a physical therapist who helped me to regain strength in my core muscle structures, back and recover foot extension/dorsiflexion.? The exercises that he had me do three times a week during our training sessions will also become part of my fitness repertoire from now on and I think they could be helpful to others with similar weaknesses.
Dr. Asaro also encourages “drawing-in” of one’s abdominal muscles and proper alignment of hips, spine and shoulders for all exercises. Naturally, during the first month, we saw the best rate of progress since I started from a place of considerable weakness all the way around my torso. The three exercises I share here are the most helpful exercises that contributed significantly to my recovery. These exercises are important to promote lumbar spine and sacroiliac stability, which has been particularly challenging in my case since my lower abdominals were damaged during the c-section.
When it comes to lumbar spine stability, what we are looking for is to strengthen the deep multifidi, which are the deep para-spinal muscles in the lower back arranged at a 45 degree angle and the deep abdominal muscles. Of these, there are four layers: the transverse abdominus, the internal obliques, the external obliques and rectus femoris. As athletes, we are most concerned with the transverse abdominus and the internal obliques contracting with the deep multifidi simultaneously to provide a stiffening effect of the intervertebral segment of the lumbar spine. When it comes to the lumbar spine, we are most interested in the five vertebral levels with a disc in between each. Every vertebral level is comprised of a vertebra, a disc and a second vertebra. The reason that the deep multifidi, transverse abdominus and internal obliques are considered segmental stabilizers is because they have attachments at each and every vertebral level. Conversely, the rectus abdominus is the top layer of abdominals which has attachment from the sternum to the pubis. It doesn’t attach directly to each vertebral level.
These are the primary stabilizers of the lumbar spine and the sacrum. There are additional secondary stabilizers of the lumbar spine and the sacrum which are the latissimus dorsi, the gluteals, the hamstrings and even the hip flexors. The latissimus dorsi and gluetals provide stability through the thoracic lumbar fascia. The hip flexors provide anterior support to the lumbar spine and have some element of segmental stabilization. The hamstrings provide stability via its attachments to the pelvis. Dr. Asaro and I have chosen to share these particular exercises to provide stability and training to stimulate the deep segmental stabilizers. Once those are performing well, we can incorporate the more global secondary stabilizers like latisimus dorsi, gluteals and hamstrings.
The importance of the stiffening effect of the lumbar spine and segmental stabilizers is that they are multi-directional since the multifidi are oriented on 45 degree angles. The exercises are not two-plane motion as you would find in a gym like performing a standard sit-up. We are seeking multi-angle or multi-planer stability such as balancing on top of an exercise ball to create a stiffening effect that recruits muscles to maintain balance. This stiffening effect of the intervertebral segments can be achieved by a contractile load of 30 percent or greater from the multifidi, transverse abdominus and internal obliques. This differs from a 100 percent contraction load of the rectus abdominus found in a full sit-up. However, the real challenge is that we require a sustained contraction for a minimum of 10 seconds with a minimum of a 30 percent contraction load, rather than the typical one-second crunch. So, in our physical activity, we train the muscles to sustain contractions, which ties into posture and appropriate alignment. This muscle strength development is key to maintain the correct “ear, shoulder, hip and heel” alignment in the saddle.? Here are some excellent exercises for developing the strength to maintain the alignment:
- Prone on the ball. In this exercise, the rider lies face down on an exercise ball with her center of gravity over the center of the ball with all four limbs touching the floor. In this exercise, we strive for a 1-point stance in which only one limb remains on the floor for stabilization. The rider draws in the abdominal muscles, maintains balance, lifts the other three limbs to be parallel with the floor ideally and hold the balance and abdominal muscles for 10 seconds. Release the muscles and limbs after 10 seconds and then move to the next limb in a clockwise fashion as the stabilizer for a 10 second hold. So, the pictured rider would perform the next pose using her right foot as the stabilizer and lift both arms to be parallel with the floor. When her legs are up, the rider is activating her gluteal muscles and when the arms are up, the latisimus dorsi are activated. There are several variations of this exercise to fit the balance and skill level of the rider. The rider can hold for less time on each set to make it easier strength-wise or she can decrease the balance demands by modifying it to a 2-point stance (i.e. opposite arms and legs). The advanced rider can increase the length of time each pose is held or increase the number of repetitions to strengthen the muscles recruited.
- Supine on the ball while performing a bridge and the arms pulling on a therapy band. In this exercise, the rider begins by sitting on an exercise ball and walks her feet out to a “bridge” position with the ball centered under her shoulder blades.? She draws in her abdomen engaging the segmental stabilizers to maintain a level bridged form, which is the key to the exercise. This exercise recruits additional muscles as the rider maintains medial lateral and lumbar pelvic stability on the ball. Once the bridge form is established with engaged abdominal muscles, the rider lifts each leg alternately to be parallel with the body and the floor. The rider also simultaneously pulls down on an exercise band which is secured to a stationary object such as a table, in an overhead motion towards the hip alternating arms opposite the leg being lifted. The benefit of this exercise is that being in the bridge position activates the internal obliques, transverse abdominus, deep mulitifidi and even the gluteals. The level bridge position also gives contraction to the hip flexors. The arm motion done slow and steady on the exercise band activates the latisimus dorsi and the leg lift motion also activates the hip flexors on the elevated leg and the hamstring muscles on the supporting leg.? Variations of this exercise to reduce the demand on the rider would be to eliminate the exercise band and arm motions, eliminate the leg lifts and/or reduce the amount of time the bridge pose is sustained from a 10 second hold to only 3 seconds. Also, the lower the ball is positioned on the rider’s back, the more medial lateral support is provided and thus reduces the muscle recruitment for balancing. The rider can increase the intensity of the exercise by upgrading the exercise band from the yellow level to a red, green, blue or even black band. She may also increase the strength level required by sustaining the bridge contraction for longer increments and repeating the pose for five minutes instead of only three.
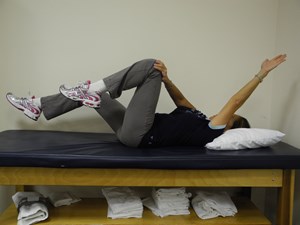
- Dead or “dying” bug exercise. The rider is lying supine on the table (or floor) with both of her arms and legs elevated. The exercise calls for contracting the abdominal muscles and pressing the opposing hands and knees against each other above the torso alternatively. The rider’s transverse abdominus, internal obliques and deep multifidi are all activated by the abdominal contraction. The opposing forces of the hand against the knee activates the hip flexor and the opposite latisimus dorsi with slow steady pressure for a hold of 10 seconds. Regressions of this exercise would be elimination of the amount of pressure of the opposing forces between the knee and hand and increasing the distance between the table and the lowered or straightened leg to lessen the demand on the stabilizing muscles. As always, the rider can increase or decrease the difficulty by adjusting the length of time the position is held, the overall time of the exercise and the amount of opposing pressure between hand and knee.
I have found these exercises to be crucial in maintaining core strength, correct alignment and recovering smartly from the two major traumas I have endured. If I had only been introduced to these concepts fifteen years ago, I may have avoided herniated discs and subsequent back surgery. My hope is that you can develop and maintain your personal best core strength and live long, strong and happy in the saddle.