

Sometimes dressage riders think it is enough to teach their horses the movements, but they don’t take into account that a young horse needs more than just movements to excel in competition and move up the training scale. Respect and self-assurance are the indispensable preconditions for building a harmonious partnership.
Silke Rottermann
There is no question that horses are stronger than we are. Because they are flight animals, trouble can happen in the daily handling and work as well as at the more intense atmosphere of a show. All too often we observe bad behavior: Horses pull their riders around, do not stand still while they are mounted and use the rider to scratch their itchy heads. While all this is tiresome, it more importantly shows that the horse has never learnt to respect the rider as the herd leader. This is the position in which the rider needs to be, and so respect needs to be established early on. This includes fairness, which is key to a horse’s contentment and happiness.
The harmonious partnership we aim for begins with groundwork even before we have the young horse under saddle. Securing a form of general obedience from the ground allows us to work in a relaxed way with our equine partner and helps a lot when it comes to riding because the horse has learnt to trust and follow us as he would in nature, following the lead mare in a herd. In this article, we show how we establish respect from the ground and how this leads to strengthening a horse’s self-assurance, which is necessary preparation for his first shows.
Step 1: Establish Respect
There is no magic. Rather, systematic training and consequence are indispensable in gaining a horse’s respect. And it must be done in a way that lacks any force, violence and injustice. Your uppermost aim has to be to become the herd leader, because in doing that you give your horse the security he needs when being worked, thereby increasing his faith in you and in the environment in which you work. The horse learns that you are the one determining the speed and direction in which he moves.
You do this by using specific body language and repeating short voice commands. Horses are usually quick learners. After showing them something new, given the right timing and praise, you only need about three repetitions to secure the behavior you want. One general remark on the use of the voice: In nature, horses communicate soundlessly. Voice aids are still useful, but we are not allowed to completely rely on them because in stressful situations the horse will pay less attention to them than to our body language. So the latter is of greater importance.
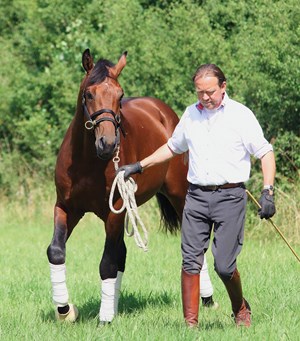
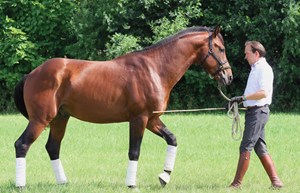
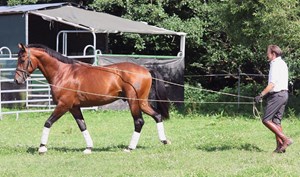
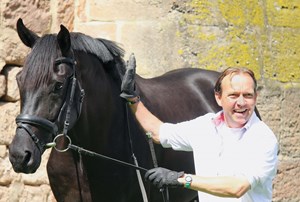
The basic needs: Groundwork begins by teaching the horse to halt, go forward and back up. With a young, unbroken horse, we most often use the Dually Training Halter designed by Monty Roberts. It works with pressure on the nose that can be quickly applied or loosened as needed.
Attached to the halter is a heavy lead rope that lies comfortably in the hand. Gloves protect the rider’s palms in case the lead rope slips through them when the horse jumps. We prefer a length of three meters (9 feet, 9 inches) in contrast to the usual two, because we have a better chance of holding on to the horse if he tries to break away.
With some horses it is useful to additionally use a stick/dressage whip to give signals, but you must first teach him to accept the touch of it on his body without fear. If a horse is not
well-behaved on the ground when you begin with him, take a whip along with you, as it can be useful whether he pulls and rushes ahead of you or wants to trundle behind.
We start with the first exercises in the security and reduced space of our round pen, but later it should be possible to do the basics in every environment. For us, it is important to establish a “relaxing zone” in the middle of the round pen, where we allow the horse to rest after an exercise. Here, he gets praised and stroked and soon knows that this is a place where he can relax.
Lead forward. Lightly pull at the rope and combine it with a voice command. I use a “kissing” noise. Usually horses understand this very quickly and soon the noise is all you need to ask them to step forward. There are several positions the leader can be in: We prefer, particularly with stallions, to have the horse’s head at shoulder height. We walk relaxed at that position while keeping a certain personal space between us. The horse is not allowed to touch us, let alone push.
If a horse tends to pull, the typical reaction is to pull back. To stop this cycle, put either the Dually halter on or attach a lead chain running from the right cheek down over the nose and into your hands. It is not about using force but about refining the signals you give. Each time the horse tries to pull forward, give a short but firm signal with the lead rope and put the end of the whip in front of his nose. Praise him when he reacts promptly.
If the horse trundles behind you, carry the whip in your left hand and point its end at the hindquarters of the horse. Usually this is already enough, and the horse will catch up with you. If not, you can slightly tap the hindquarters to get the desired effect. Repeat until the horse has learned you will not tolerate him staying too far behind you.
Halt. A much-needed basic the young horse has to learn is to react to pressure applied by the rope running over his nose. The horse should learn to give to the pressure. If we want
the horse to halt, we give a short impulse with the rope and combine it with a short but clear voice command. I use “whoa.” As soon as the horse reacts to this combined command, the pressure applied by the halter has to stop and he has to be praised accordingly. Some horses—in particular, sensitive, “electric” ones—understand the signals promptly, and you soon can give very fine impulses. Others will only react to your voice command. But some more phlegmatic types don’t react immediately to the impulse given by the rope over the nose, and you have to give several small but firm impulses in succession. If he continues to ignore me, I increase the impulse by putting the end of a whip in front of his nose.
Go backward. Once the horse learns to halt obediently and reliably, start teaching him to go backward. For that you need a rail on one side of the horse so he cannot evade you. Stand in front of him and take the rope with your left hand about where the snap attaches to the halter. The shorter the rope is held, the more directly the impulses are transferred to the horse’s nose.
With your right hand, hold the rope in a loop. The horse already knows that the pressure on the nose means to yield. It is important that the impulses you give via the rope are short but repetitive. If the horse does not react, use the end of a whip or bamboo stick to apply short taps on the shoulder. Eventually, it should be sufficient to give slight impulses on the nose for the horse to walk backward in a quiet rhythm.
Directly after the last step backward, you must establish the forward impulse in your horse again and ask him to step forward. With some horses, you may need to pause and relax for a moment at the end of the rein-back, but the horse must always be willing to step forward out of the rein-back at any time.
Silke Rottermann
Silke Rottermann
Silke Rottermann
Step 2: Increase Self-Assurance with Long Reins
Once the young horse becomes familiar with the voice commands to go forward and he can halt, we begin longeing him in a round pen. We start with a single longe line, then add a second line so he gets used to them running behind his hindquarters. This is good and necessary preparation for the work in long reins.
Cautionary note: Find someone to help you. Remember that we have a lot of experience longeing and using long reins, and you need to be experienced too if you are going to try it.
Longeing and long-rein work releases the horse from the immediate proximity of his herd leader and asks him to discover his environment almost on his own. Going out in long reins develops and strengthens a young horse’s self-assurance and consolidates his faith in his rider, who now walks behind him. With more advanced horses, this work is a way of keeping them entertained between training sessions in the dressage arena.
What you need: We use a snaffle bridle with an egg-butt or full-cheek snaffle bit in combination with a flash noseband. The cheekpieces and noseband help keep the bit quiet and straight in the horse’s mouth.
We prefer soft, round long lines to flat, webbed ones. We attach them to the bit rings and always wear gloves.
We use the same voice commands we’ve been using. In general, the long reins replace the rider’s calves and together with the voice commands take care that the horse moves in the direction and speed we intend to go.
We don’t use a surcingle when long-reining so the reins can have more freedom of movement. We can touch the horses where we need to and can work them in a more sensitive way than when the reins are fixed on a surcingle.
First exercises. The first time we use long lines on young horses, we stay in our longeing circle or round pen, but you can also use a normal arena or indoor. We use all the commands the horse already knows from his weeks of groundwork.
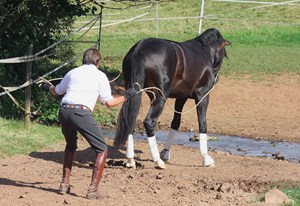
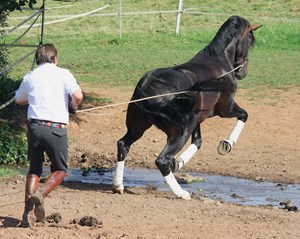
Day by day, we explore the yard a bit more. For example, we might go to a nearby field or to the edge of the forest. If you observe that the horse is more and more comfortable in his new position ahead of you, show him some new tasks to deal with, such as walking into puddles or over logs, walking, trotting or even jumping over poles on the ground. Never forget to promptly praise him after he has mastered a new task.
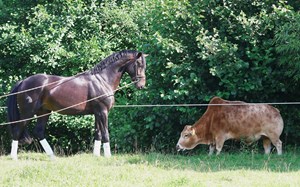
The more faith he develops in you and himself, the more you can look for new challenges. We may ask our youngsters to pass by a grazing herd or work in long reins next to others. Or we might ask them to go through the creek running through our property. After extensive rainfall, we sometimes have a kind of lake in our courtyard, and we like to ask the horses to walk and trot in there to get used to water splashing their legs and belly. Be sure to do everything slowly, never asking for a second step before the first one. Then your horse will develop positive self-assurance, helping him to deal with the same things more easily when being ridden.
Silke Rottermann
Silke Rottermann
Silke Rottermann
Silke Rottermann
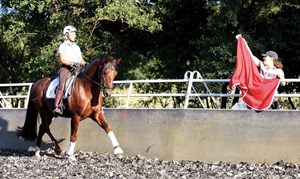
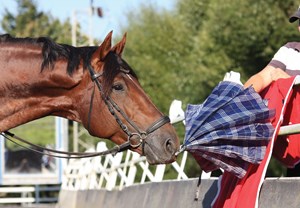
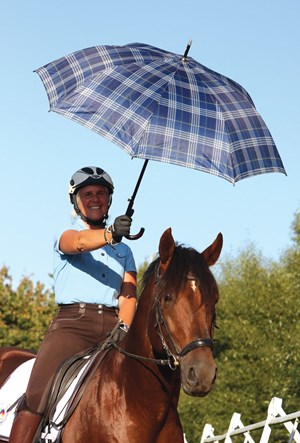
Step 3: Desensitization—Prepare Your Horse for the Unknown
Sometimes there are dressage riders who think that working their horses in a focused manner is only possible by excluding them as much as possible from any outside influences. A horse might be oversensitive for whatever reason and so needs to be worked in quieter surroundings in the beginning. But, in general, we are strong believers that it is no good hiding horses behind the walls of an indoor arena with the atmosphere of a monastery. Dressage horses are destined to be competed at shows and there they will find a whole lot of stimulation and noises that could easily distract them if they have not already seen and heard as much as possible at home. This is particularly necessary for stallions.
So part of our dressage training at home is to desensitize the horses to a lot of different noises and visual impressions that could come at them when it counts the most—at the showgrounds. Of course, we will never be able to simulate the special atmosphere at a show, in particular the ones held in a big stadium. And we will never know for sure what we will find there. But the more we show the horses, the more we know how they might react, and that gives us, the riders, the chance for prompt reactions. For example, we accustom stallions to working in the presence of mares step by step.
Cautionary note: Get help to do this, and remember that beforehand the horse needs to have learned respect for and faith in his rider.
The easiest form of desensitization is to keep horses outside as much as possible where they can see and hear a lot more than they do just standing in stalls. It helps to include regular trail rides in your training program so that your horse is not panicking if a bird flies out from a bush. Training outside in all types of weather helps horses when they have to compete in rain or worse.
The most decisive factor is that you have a firm impact on your horse if he spooks. “Firm” doesn’t mean to bore spurs into his flanks and holler loudly for him to pass the frightening object. Such a reaction, often seen, only strengthens the horse’s flight instinct and lets the “monsters” appear even more dreadful. Horses think in pictures and next time will associate the monster with the pain of the spurs or whip. Instead, when your horse meets a frightening object, react in the following way:
- Take the reins a bit shorter and halt in front of it. Allow your horse time to look or sniff at it quietly while you talk calmly and pat or stroke him. This also calms you down as the spook of your horse usually also makes your heart beat faster.
- Then pass the object a few times on each lead in walk, preferably in the shoulder-fore position.
- Now divert your horse’s attention from the object that frightened him by starting to trot and going on with focused work. Very effective, for example, is riding lots of different transitions so that the horse soon puts his thoughts in another direction and forgets about the fear.
Often it is typical objects like flags rattling in the wind, umbrellas being opened, running and barkings dogs, loudly clapping crowds or music that frighten young, inexperienced dressage horses at shows. Luckily, these are things that can quite easily include in desensitization training at home. All you need are some helping hands confronting the horse while you sit in the saddle. The advantage is that, in this case, you are aware of the fact that your horse might spook, jump sideways or show a little rear as a first reaction. Go slowly, step by step.
Don’t confront your horse with more than one frightening object in a lesson. Switch to another one the next time. Then, on another day, go back to the first object to confirm the horse’s positive reaction. If he ignores the once-disturbing object, great, but try once more on another day until there’s no significant reaction to it anymore.
There are horses that have to repeat this training several times over a longer period and only a very few never become bombproofed. The decisive factor is that you and your horse have built faith in and respect for each other. Then the horse will not bolt away panic-stricken.
Desensitization is just a way to strengthen this respect and faith and see if it is already strong enough or has to be deepened even more. When your horse is familiar with several different objects and doesn’t panic or spook at them, you can try an obstacle parcours, or obstacle course, including several of the objects following one another. You can ride this parcours or lead the horse, however, the motto has to be “make it more difficult.” This kind of overstimulation will harden your horse and done step by step, it will help enormously at a show.
It is also useful to take the horse to a show just to work in that atmosphere. There, you can see how he reacts to different objects and determine whether he still needs training at home or if you can start him with a quiet conscience.
Knowing that the young horse’s future is destined to be in the dressage arena, we set a good foundation from the ground. This kind of work helps you and your horse master the first starts outside the secure surroundings of your home turf. The horse knows that whatever comes his way does not have to be frightening because you, as his herd leader, are at his side.
Silke Rottermann
Stefan Schneider and Uta Gräf are headquartered at Gut Rothenkircher Hof in Germany. Schneider, a veterinarian specializing in equine dentistry, has competed in jumping, reining and working equitation at the highest levels. Gräf is one of Germany’s most successful competitive and classical dressage riders. Both are well known for combining top sport with natural horsekeeping. At home, Schneider works the horses from the ground while Gräf does the riding. Gräf’s DVD series, “Joy of Dressage,” comes out in English in April. Schneider has co-authored the book Stallions Care and Management. Look for reviews of both in future issues (gutrothenkircherhof.de).