In the 18th century, the French riding master François Robichon de La Guérinière was looking for an exercise that created more shoulder freedom in the horse, enabling him to move laterally in an easier and more beautiful way. As a result, he invented the shoulder-in, which has become one of the most fundamental exercises in the training of a dressage horse. It is not only a requirement in dressage tests but also the building stone for all other lateral movements, from the turn on the haunches, (at walk) to travers (at trot and canter) to the canter pirouette. The rider who is able to ride his horse in a correct and controlled shoulder-in will later find all other lateral movements easy.

Every horse has some natural crookedness, which the rider must diminish in his training. Horses tend to fall in with their haunches when moving on a straight line because the hindquarters are wider than the shoulders. The systematic training under saddle is to improve this natural “left- or right-handedness” in order to have a supple horse on both hands. The horse must be made straight and step with both hind legs in exactly the same direction as the front legs. As a consequence, the legs are being burdened evenly as opposed to evading sideways. Many riders forget that the horse has four legs since, from their position in the saddle, they only see the forehand. Suppleness and elasticity in the haunches, however, are fundamental qualities in a well-trained dressage horse. The forward-sideways moving in the shoulder-in helps the rider improve the horse’s lateral bend and activate the haunches to develop more carrying power. Now it becomes easier for the rider to control the horse’s “engine.”

The Aids for Shoulder-In
In shoulder-in, the horse is bent around the rider’s inside leg at about a 30-degree angle, moving forward on three tracks. The hindquarters remain on the first track, while the rider guides the forehand toward the inside of the arena so that the horse’s inside hind leg moves in the direction of the outside front leg. The outside hind leg is on the first track, the inside hind leg and outside front leg are on the second track and the inside front leg moves on the third track. Ideally, in the shoulder-in, the rider gives the horse security through his own inner balance. This causes the horse to concentrate more on the rider than on his natural instincts.
It is crucial that the rider guides the horse with the outside rein and determines the degree of flexion with the inside rein. At the same time, the rider increases the weight on his inside seat bone, drives the horse forward/sideways with his inside leg at the girth and maintains the haunches with his outside leg behind the girth (this is called a guarding outside leg.)
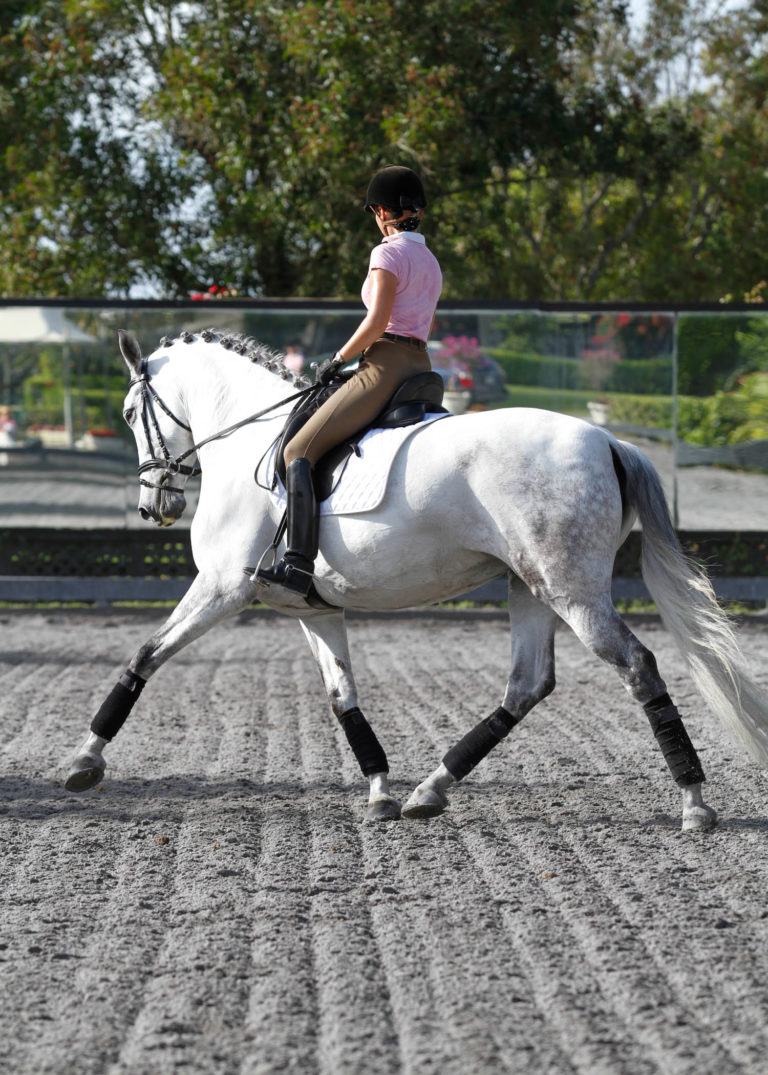
When working on the shoulder-in, it is highly important to distinguish between a horse with “square” conformation and a horse with “rectangular” conformation (see photos). The square horse requires more lateral bend in the shoulder-in to be able to execute it correctly on three tracks. One has achieved the correct amount of bend when the horse can see his inside hind leg with his inside eye. In this ideal case, the horse is bent like a banana.

When working with a rectangular horse, one easily ends up on four tracks instead of three if one allows too much lateral bend. The rider should only be able to see the inner half of the horse’s face. Generally, riders do better with rectangular horses because we tend to make square horses too short in their necks. The square horse’s body is already so compact that he easily gets too short in his neck when sitting more on his haunches, such as when riding shoulder-in.
When and How to Begin
In dressage tests, the shoulder-in is introduced at Second Level. When schooling, I recommend using it also at First Level because the throughness it creates in the horse also improves his straightness. Shoulder-in improves the articulation of the joints in the haunches, improves the shoulder freedom and makes the horse more supple. Furthermore, it consolidates a horse’s balance, and he becomes more obedient. Personally, I teach the shoulder-in to very young horses. It helps them develop better balance earlier on, and they are better gymnasticized. The increased sense of security this gives them also makes them mentally stronger. “You can’t teach an old dog new tricks” is a motto I like to apply when it comes to essential exercises, such as the shoulder-in. However, I recommend that an inexperienced rider not start the shoulder-in before the horse is at the end of his fourth year to prevent taking away too much rhythm and impulsion from the horse. If you start too early, the hindquarters tend to be left out behind instead of stepping more under. A shoulder-in is not necessarily a correct shoulder-in. It all depends on the quality of the execution.
1. Voltes: These small circles are the foundation for developing the shoulder-in. The horse must have learned to move on bent lines in correct lateral bend and take up more weight with his inner hind leg. He must step into the outside rein and respond to half halts and full halts. The rider must sit in balance, his shoulders parallel to the horse’s shoulders. If all of this is in place, one can begin with the shoulder-fore.

2. Shoulder-fore: I start by setting my horse up for a change through the diagonal after the corner of the short side of the arena. However, instead of allowing my horse to actually change through the diagonal, I continue to ride down the long side with this same amount of bend. This way I achieve a shoulder-fore, a preliminary exercise to the shoulder-in. The goal is to align the horse’s legs with the hind legs, which gives the horse a slight flexion and bend. While his inner hind leg steps between his front legs, his outside hind leg must remain on the track of the equilateral front leg. Because the horse’s hind legs now step closer together, this preliminary exercise encourages him to increase the weight bearing on the hind legs.

3. Shoulder-in: If the rider now slowly increases flexion and bend, the shoulder-fore turns into a shoulder-in. It’s crucial that the rider first guides the horse’s head, then his shoulders, then his midsection and, only then, the hindquarters. To really live up to the horse, the rider must mentally divide the execution of the shoulder-in into these four sections. Furthermore, being two-legged creatures, we need to understand the situation of a four-legged creature. In the beginning, choose a slow tempo that gives the horse the chance to find the right balance. Here the rider must always pay attention to the evenness of the rhythm.

Once the shoulder-in has been confirmed, start working on impulsion. Practice the shoulder-in in short intervals, changing frequently between moving laterally and straight ahead. To complete the shoulder-in, lead the horse’s forehand back to the track again with your outside rein and inside leg. I recommend practicing shoulder-in on the second and third tracks in order to become more independent from the wall.
Common Problems
While there is only one correct way to execute a shoulder-in, there are a variety of mistakes, which most of the time are caused by the rider, who must be able to help the horse with his body, not impede him. As with all exercises, the rider needs to be mentally and physically at least three steps ahead of the horse. Only then can the pair achieve harmony and, through the rider’s invisible aids, dressage becomes beautiful to the observer. In order to achieve this goal, the rider must recognize mistakes in advance before they actually happen.
The horse escapes over his outside shoulder when the rider fails to guide him with the outside rein. For the majority of riders, the inside rein dominates. This way, the problem starts already on normal bent lines and multiplies as the degree of difficulty in a movement increases. So the inside hand is only responsible for flexing and suppling the poll. A good rider is able to yield with the inside hand at any given moment without losing the contact, since the rider guides and steers the horse with the outside hand.
Many riders collapse their hips, shifting their weight to the outside. The weight, however, must be on the inside seat bone. One can test this by simply stepping into the inside stirrup. Only the rider who truly weights his inside seat bone is able to shift his weight onto the inside stirrup and step into it. Constantly check your aids to make sure they’re correct. If the horse still escapes over his outside shoulder, ride short intervals of shoulder-in, and at the end of each shoulder-in, straighten the neck and ride towards the inside of the arena.
The hind legs fall out when the rider steers too much with the hands and fails to guard the exercise with the outside leg. The tension in the horse’s topline is too high. Because he has four legs, this causes the horse to find a way out, and he will fall out with the hind legs. When encountering this problem, the rider must re-create relaxation and transfer it into the exercise. Often times, it’s sufficient to ride a volte, making sure not to be thrown to the outside like a centrifuge. The inside, forward-sideways-driving leg must remain in a forward position with the toe at the girth.
The horse sways if the rider’s weight has shifted to the outside. In addition the rider uses too strong rein aids, which he is not able to live up to with his driving leg aids. As a result, the horse loses rhythm and impulsion and tries to evade the rider. To solve the problem, the rider must begin with more calmness and demonstratively sit to the inside. Furthermore, he must be mentally riding shoulder-in before the horse enters it. Having chosen a calm tempo at the beginning of the shoulder-in, increase the tempo step-by-step. Ride only brief intervals of shoulder-in, interspersing it with voltes and riding straight ahead.
One loses impulsion if the angle is too large. In this case, most of the time, the leg pairs already move on four tracks instead of three, and rhythm faults develop. One mistake creates the next, and the horses often also become too short in their necks. To prevent this from happening, the rider must have the horse set up correctly in preparation for the shoulder-in. This is where most mistakes occur. The rider will again have too much pressure in the hands, which he can’t live up to with his driving leg aids. At the same time, the shoulder-in often is ridden for too long a period of time. Quiet horses, in particular, will quickly lose impulsion. The rider must ride short reprises of shoulder-in only and be able to end the exercise at the best moment. If the rider exhausts each exercise he rides, the horse tends to lose joy and interest in the work. If we riders enjoy and exhaust the beautiful exercises too often, we destroy them.
Another mistake of the rider is that he demands perfection in the first try. Instead, approach an exercise slowly, and only demand perfection in the second or third attempt. First, the horse must become supple, just like his rider. The horse and rider must find each other anew at each step. This is why, before a dressage test, one rides an exercise a few times before entering the show ring.
Tilting the head is easy to recognize. If the ears are not level, he is tilting. The biggest error lies in missing outside rein contact. If the inside rein dominates, it turns the shoulder-in into some sort of “head-in” instead of shoulder-in. To correct this mistake, give frequent half halts with your outside rein and relax your inside hand.
When working with a rectangular horse, avoid seeing the horse’s inside eye, keeping him almost straight. A square horse doesn’t easily tilt his head, so when he tilts his neck, the rider must have made various mistakes. Most often, the horse is not correctly on the driving aids and gets too short in his neck. The rider must support the horse through his own balance so that rhythm and impulsion can develop. At the same time, he must increase the tempo step-by-step with his inside leg. Most of the time, the riders hands dominate over the driving leg aids. Also, we riders tend to be a little impatient and ask for exercises in our training for which the horse isn’t supple enough, especially in his back.

Training the Shoulder-In
Most of the time, I ride a shoulder-in right away in the warm-up phase at rising trot. It helps me to gymnasticize my horses optimally for the work to come. However, I only recommend this if the rider is balanced enough and able to support, and not impede, the horse with his aids.

For this special way of warming a horse up, most of the time I ride on the second track so the horse completely trusts my aids, even when away from the wall. I then ride only five to eight steps of shoulder-in, and then ride a volte. This way, I ride four to five voltes along the long side of the arena, however, it’s also important to ride shoulder-in and voltes along the short sides of the arena in order to control the horse better. Here is where the biggest mistakes occur later on, since the difficult movements always begin after a short stride. The voltes should always be five to six meters in diameters—for the square horse, the smaller volte and for the rectangular horse, the bigger volte, to make sure rhythm and impulsion remain in tact.
Also, after the warm-up phase, I prepare almost every movement with riding a shoulder-in. I even go further. I ride every horse during the whole training session almost always in a slight shoulder-fore. I tell my students to “think” of a slight shoulder-fore and actually lead the horse’s forehand a hoof width to the inside of the track. Also, on the long side, one can control the horse this way at any time and guide it into a volte, for example. It helps horses that are particularly fearful to become more confident, with the result that the riding becomes easier. Horses with rhythm problems at the walk benefit from riding in a slight shoulder-fore, as it stabilizes them.
In general, one must always take care to be ahead of the horse mentally. A good rider must be able to put himself in the horse’s place and know what is necessary at a given moment in order to reach the goal as quickly as possible. While the shoulder-in and shoulder-fore are not universal remedies, they are often applicable and helpful.
The key to good riding, however, is to be able to control and correct oneself constantly. If the rider encounters a problem, he must first look for the cause in himself. Most of the time, the rider is the cause of the problem. Only someone who looks at his own riding critically and is willing to improve constantly and learn more will be a good rider.
This article first appeared in the September 2010 issue of Dressage Today magazine.
Ernst Hoyos learned to ride in his native Austria on his father’s Icelandic ponies and racing Thoroughbreds. At 17, he was accepted at the Spanish Riding School in Vienna where he studied for many years. In 1993, he began working at Olympic Medalist Ulla Salzgeber’s stable in Germany, where the two continue to collaborate. He has worked with many other top horses and riders, including Lisa Wilcox, a U.S. Olympic medalist. Hoyos is featured in David Collin’s book, Dressage Masters.


