Just as no hoof means no horse, without a correctly set-up arena you have no dressage test. Perhaps this added pressure, combined with the seemingly overwhelming task of perfectly arranging countless rails and letters in a precise rectangle, is what causes many show volunteers to get as nervous as a competitor when they see the letters A, K, E, H, C, M, B and F together. However, this task is not as difficult as it seems when you have the right tools for the job. Here is how:
Prepare for Your Setup
Before you begin to set up, you will need a second person to help you. Additionally, make sure you have: 1. four stakes, 2. arena fencing, 3. arena letters, 4. two 60-meter measuring tapes, 5. two 100-foot builders tapes and 6. arena diagrams, drawn to scale and marked with the letters.
Use one 60-meter measuring tape as an approximation, confirm that you have chosen an appropriate location for your 60-by-20- or 40-by-20-meter ring and that there are no obstructions. Check every inch of the footing that will be included within this space for holes or other problems. This first step will reduce the chances that you will have to move the ring and redo the entire process halfway through. The short wall of the arena that is closest to the judge must be between three and five meters from the judge’s box. The arena placement should not face the judge into the sun. Lastly, the opposite short wall must allow the competitors enough space to turn and straighten before passing A and entering the arena.
Set Up the First Two Corners
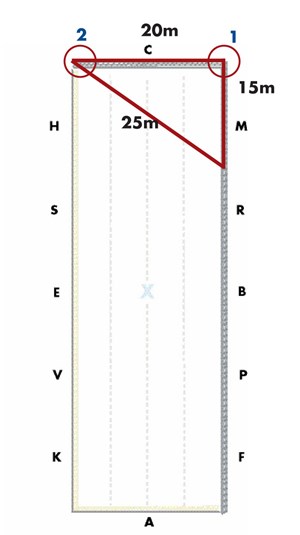
Once you have a rough idea of where your ring will be located, begin by marking your first corner (between C and M) with one of your stakes (see Point 1 on Figure 1, p. 20). Establish a 90-degree angle in that corner by using the Pythagorean Theorem (the sum of the squares of Sides One and Two is equal to the square of the hypotenuse):
1. Measure the first 15 meters of the arena’s first long side (where M to F will be located) with your first 60-meter measuring tape. Mark the end with a stake (see Figure 1).
2. With your second 60-meter measuring tape, measure the short side of the arena (where C will be located) to 20 meters and mark the end with your third stake (Point 2 on Figure 1).
3. You have found your perfect 90-degree angle when you are able to connect these points with a hypotenuse of 25 meters. (Make sure the first and second measurements are still 15 and 20 meters, respectively).
The third stake (Point 2 on Figure 1) that has marked the 20-meter distance from your first corner should stay in place, as it now marks the second corner of your arena’s short side (where C will be located).
Set Up the Last Two Corners
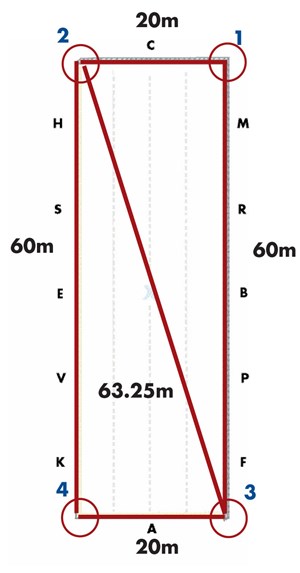
Now it is time to mark your first full long side of the arena (where M and F will be located). Measure 60 or 40 meters from the first stake (the corner between C and M) to the other corner on the same long side (Point 3 on Figure 2). The length will be based on whether the ring is a large arena (20 by 60 meters) or small arena (20 by 40 meters). The way to approximate that this third corner is correctly located is when the tape is taunt at 40 or 60 meters. Confirm that you are correct by measuring the distance from the new (third) corner to the second corner. You have found the exact location when you get the following measurement (see the line connecting Points 2 and 3 on Figure 2):
• Large arena diagonal length: 63.25 meters or 207 feet, 6 inches
• Small arena: 44.72 meters or 146 feet, 9 inches
Once you have confirmed these two measurements, drive you third stake in to mark the third corner (between A and F), creating the other corner for the first long side where M is located (Point 3 in Figure 2).
The final corner is located at the junction of two measuring tapes—one measuring 20 meters from the third corner you just marked with a stake and the other measuring 60 or 40 meters (for a large and small arena, respectively) from the second corner (Point 4 in Figure 2, p. 20). When you have found this point, mark this final corner (between A and K) with a stake. You now have the outline of the final short and long sides of the arena and all four corners will be exactly square.
Set Up the Arena Rails and Letters
Using your measuring tapes as guides between the stakes, connect the four stakes with your arena rails, starting in the corners. This is especially important if you have corner pieces, so that they are set aside and used in the correct location before you start to arrange the remaining rails. Make sure to leave an open space in the center of the short wall opposite the judge’s stand at C for the horse to enter at A.
As you continue, keep checking that the distance between the long sides is consistently 20 meters and the distance between the short sides is consistently 60 or 40 meters (depending on the size of the arena). When you are finished with all of the rail setup, measure the diagonal distances again to confirm that they are still 63.25 meters (or 207 feet, 6 inches) for a large arena or 44.72 meters (or 146 feet, 9 inches) for a small arena.
Your last step is to take your arena letters and put them in place. Refer to the arena diagrams (Figures 1 and 2) to determine their placement. Remember that there is a distance of six meters from the short walls to H, M, F and K. The remaining letters have 12 or 14 meters between them, in the large and small arenas, respectively. Finish the arrangement off by marking the exact corresponding location of each letter on the rail. This will help the riders and judge(s) determine their location with even more accuracy.