Sensitive, independent hands are the goal of all classical dressage riders. This is achieved through adequate strength that is evenly balanced as a result of a well-stabilized shoulder girdle and upright posture. These things allow the upper arms to hang freely and perpendicularly from the shoulders with weighted elbows and relaxed forearms. An elastic connection to the horse’s mouth is then possible in the elbows and shoulder joints.
Shoulder stability relies on the position and stabilization of the shoulder blades (scapula), which float in a network of muscles and ligaments on the upper back ribs, attached only by the tiny sternoclavicular joint where the collarbone attaches to the breastbone. Therefore, the shoulder girdle relies heavily on its musculature for function and stability. Alignment and correct posture are of paramount importance in healthy shoulder mechanics. Unfortunately, our lifestyles are not conducive to correct shoulder function or good posture. Hunching over computers, holding cell phones between our ears and shoulders, and carrying heavy bags, combined with stress, tension and, at times, fear, all contribute to tight shoulders that result in poor alignment and, therefore, a loss of integrity within the shoulder complex.
An issue I often see is the incorrect cueing regarding the placement of the shoulders. Whereas we do not want elevation, “draw your shoulders down and back” or “place your shoulders in your back pockets” more often than not results in depression of the scapula and in the former, a flaring of the rib cage as the shoulders are thrown back. This creates just as much, if not more, tension than when they are elevated up to the ears. Scapular depression jams and immobilizes the shoulder girdle, stiffens the thoracic area and inhibits the flow of movement throughout the spine that is required to absorb the energy of the horse coming up from underneath. Continued depression of the shoulders can also predispose you to injury from impingement, tendonitis and bursitis to the rotator cuff as well as labral tears. I like to cue a lengthening of the collarbone out to the sides to create width both front and back of the upper torso. With the pelvis, rib cage and head vertically stacked on top of one another, creating correct alignment, and along with the activation of the core stabilizing muscles and the flow of the breath, you have a dynamically stable and beautiful upright posture without rigidity and excess tension. An unmounted exercise program will train the movement patterns and correct muscle recruitment. Over time this conscious control of correct alignment becomes an automatic process you no longer have to think about when you are on your horse.
In Pilates we always work from the inside to the outside—the small muscles that lie deep in the body to stabilize the joints then on to the larger muscles that are responsible for moving the limbs. This exercise sequence will first release and stretch the often-tight muscles at the front of the shoulders, then progress to the postural and strengthening exercises. You will develop a deeper awareness of the connection between your upper back muscles and their role in influencing the horse. Correct and well-functioning upper-body posture doesn’t just make a rider look more attractive in the saddle, it makes her more effective.
Helen Fletcher, of Equipoise Pilates for Equestrians, is an Australian Pilates method instructor with 20 years of personal practice and eight years of professional teaching experience, ranging from post-acute rehabilitation, postural and movement education to elite athletic sports conditioning. A rider from childhood, Fletcher has found that Equipoise draws together her passion for both Pilates and classical riding (equipoisepilates.com.au).
The Exercises
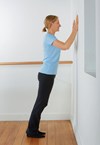
Pectoralis Stretches
Tight chest muscles cause the shoulders to round forward, inhibiting shoulder-blade stabilization and breathing. These two simple stretches will release and open the chest.
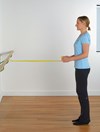
Stretch One for Pectoralis Major (top right)
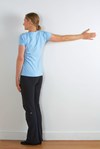
1.Stand facing a wall. Place your toes against the wall and gently lengthen through the crown of your head. Make sure that your spine and pelvis are in a neutral position.
2. Lengthen your right arm out in line with your shoulder against the wall at a 90-degree angle. Slowly begin to walk your feet and body to the left, maintaining your neutral posture with your rib cage. Keep your head above your pelvis as you rotate.
3. Continue to rotate until you feel a stretch across your chest and at the front of your right shoulder. Stay here for a minimum of 30 seconds. Return to the start position.
4. Repeat this sequence twice and then change to the left arm.
Stretch Two for Pectoralis Minor (bottom right)
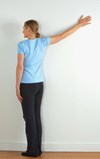
1. Begin this stretch the same as the one above, making sure that your spine and pelvis are in a neutral position.
2. Lengthen your right arm out inline with your shoulder against the wall at a 90-degree angle and elevate it to approximately 135 degrees.
3. Repeat the same movement as with the first stretch and walk your feet and body around to the left until you feel a stretch in the front of the shoulder.
4. Repeat this sequence twice and then change to the left arm.
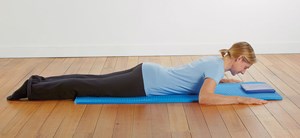
Scapular Setting
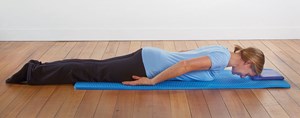
This exercise develops an awareness of the placement of the shoulder blades while strengthening the middle and lower trapezius muscles for shoulder-blade stability.
1. Lie face down on a mat or comfortable firm surface. Place a small towel underneath your forehead. Relax your arms down by your sides. Place your toes together and heels apart so that the gluteal muscles are also relaxed.
2. Gently activate you core muscles by lifting the pelvic floor, drawing your lower abdominals in and up toward your spine. Gently lengthen your lower back and send your sits bones toward your heels.
3. Exhale as you lengthen the ends of your collarbone out to the sides of your body and pick up the shoulders from the mat. Your head and arms must stay heavy, and the musculature at the back of your arms must stay soft. No pinching the shoulder blades together. Focus on broadness across the upper back. You should feel this exercise around the base of your shoulder blades and the middle of your back. With shoulder movements remember—as much as necessary and as little as possible. If you over-recruit the muscles in this awareness exercise, the outer-moving muscles will take over. Be subtle.
4. Inhale at the top of the movement.
5. Exhale gently back down to the mat.
6. Repeat 10 times.
Cobra Preparation
This exercise mobilizes the spine and upper back, and further develops an awareness of the shoulder blades.
1. From the position for Scapular Setting, bend your arms and place them on the mat at either side of your head, slightly wider than the shoulders, with your thumbs in line with your ears.
2. Gently activate your core muscles by lifting your pelvic floor and drawing your lower abdominals in and up toward your spine.
3. Inhale as a preparation for the next movement.
4. Exhale as you lengthen your collarbone and set your shoulder blades.
5. Inhale as you lengthen out through the crown of your head and begin to lift your head, neck and upper chest off the mat. Keep your ribs on the mat and do not push with your arms. We want your upper-back muscles to be doing the work. Imagine you have a light on your breastbone and you are shining it toward a wall in front of you.
6. Maintain a sense of length in your collarbone and broadness in your upper back. Do not pinch your shoulder blades together.
7. Exhale as you lower back to the start position.
8. Repeat six to 10 times.
Dumb Waiter
This exercise strengthens the rotator-cuff muscles responsible for internal and external rotation and keeps the upper arm correctly placed in the shoulder joint. It also strengthens the upper back and improves posture.
1. Stand tall with your feet hip-bone width apart and an even three-point pressure under both feet—the base of the big toe, the base of the small toe and the center of your heel.
2. Gently lengthen through the crown of your head.
3. Activate your core muscles by lifting your pelvic floor and drawing your lower abdominals in and up toward your spine.
4. Bend your elbows to a right angle; your upper arm should be positioned vertically and your forearm lengthened horizontally.
5. Turn your palms to face upward.
6. Inhale to prepare for the next movement.
7. Exhale, connecting to your center as you keep your elbows underneath your shoulders and rotate your arms outward from the shoulder joint, reaching your forearms wide.
8. Inhale as you return to the start position. Your forearms will once again be parallel. Be sure that the movement comes from your shoulder joint alone—do not squeeze your shoulder blades together or depress your shoulders. Instead, feel a sense of length across your collarbone and broadness across your upper back.
For further challenge using this exercise, hold an exercise band in both hands. This will challenge your stability and strengthen the deep muscles of the shoulders.
Wall Push-Ups
This exercise works the serratus anterior muscles that help to stabilize the shoulder blades, and develops an awareness of correct upper body posture.
1. Stand with your hands flat on the wall, just wider apart than your shoulders. Your feet should be parallel and hip-bone width apart. Lengthen through the crown of your head and engage your lower abdominals.
2. Lengthen the collarbone and feel as if you are very subtly drawing the tips of your shoulder blades toward one another. Do not squeeze the shoulder blades together or depress them.
3. Inhale as you lower your body toward the wall. Maintain correct alignment with your head and rib cage sitting directly over your pelvis. Do not hollow the lower back.
4. Exhale as you push away from the wall, maintaining a
neutral spinal alignment and correct shoulder position.
5. Repeat this exercise 10 times.
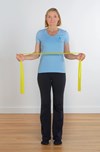
Upper Back Row
This exercise works the rhomboids, trapezius and posterior deltoid muscles, all vital musculature of the back and shoulders.
1. Tie the middle of an exercise band to a sturdy door knob. Make a knot at each end to hold on to or you may attach ready-made handles.
2. Stand evenly on both feet and lengthen through the crown of your head in a neutral spine alignment. Your arms are straight and out in front of your body, just below shoulder height, with your palms facing down.
3. Engage your pelvic floor and lower abdominal muscles to maintain your stability as you work through the repetitions.
4. Exhale as you bend your elbows out to the sides and pull the band toward you. You should be making right angles at your elbow joints. Do not allow your shoulders to elevate toward your ears.
5. Inhale as you control the band back to the start position.
6. Repeat this exercise 10 times.
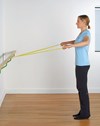
Latissimus Dorsi Row
This exercise works the latissimus dorsi (posterior deltoid muscles of the back and shoulders). It is a similar movement to the horse “chewing the reins out of your hands.”
1. From the start position of the Upper Back Row, take a step backward to increase the tension on the band. Face your palms to one another. Feel an even pressure underneath your feet, and try to maintain this as you do the exercises. You may need to engage your core a little deeper to maintain the stability of your torso.
2. Exhale as you slowly draw your elbows back toward and in line with your waist.
3. Inhale as you hold here.
4. Exhale as you slowly release your arms back to the start position. The emphasis here is on the controlled return to the start. This works the muscles in the eccentric phase (lengthening) of the movement and also challenges the core. Be sure to maintain the stable position of the shoulders here, do not allow them to elevate or round forward.
5. Repeat this exercise 10 times.
Standing Bow and Arrow
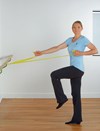
This exercise works the latissimus dorsi, posterior deltoid and the oblique abdominals and promotes and improves spinal mobility.
1. From the start position of Latissimus Dorsi Row, lift your arms slightly higher in line with your shoulders.
2. Engage your pelvic-floor and lower-abdominal muscles to maintain your stability.
3. Exhale as you draw your right elbow back behind your body as if drawing back the string of a bow. Begin to rotate first your head, then neck and then thorax. Maintain a stable pelvis and lower body. The rotation is only with the upper body. It is helpful to facilitate greater rotation by lengthening your right arm forward as your left arm draws back.
4. Inhale as you return to the start position.
5. Exhale and repeat this exercise on the other side.
For additional challenge try standing on one leg during these last three exercises. This challenges the core, your balance and the muscles that stabilize your pelvis—all very important for dressage riders. Make sure when you stand on one leg that your pelvis is level and that you are really stretching tall out of your standing leg. This will help to keep you stable.